Email Campaigns Suppression List
Modified on: Thu, 15 Jan, 2026 at 6:48 PM
When you are sending emails to your customers, their email addresses can be added to the Email Campaign Suppression List if they unsubscribe from your emails or if the email address bounces too many emails. You can also manually add both a single or multiple email addresses to the Suppression List.
The Email Campaigns Suppression List helps you manage your emails better and make sure they get to the right people. You'll have more control over who gets your emails, which helps you build stronger relationships with your clients.
TABLE OF CONTENTS
| Check out our video if you want to watch and follow along!  |
 | Did you know? - You can click on the images in our articles to zoom in! |
Accessing Email Campaign Suppression List
| To access the Email Campaigns Suppression List: 1. Hover over the Communication Center Icon (text bubbles). 2. Under the Email Campaigns section, choose Suppression List. This will take you to the Email Campaign Suppression List page. At the top of the page, you'll see an explanation of this page's purpose: "This page lists email addresses that are suppressed from receiving marketing email communications. These addresses may still receive essential, non-marketing emails such as policy updates or account notifications." |  |

Filters
You can find a specific customer by using the following filters:
- Search for Suppressed Email Addresses: A search bar lets you find specific email addresses.
- Suppression Event Type: Filter the list by "Unsubscribed," "Bounced," or "Spam”.
- Clear Button: This button clears any search and filters and resets the table back to default.

Suppression List
The main part of the page shows a table of emails with the following columns:
- Email Address: Here you will find the blocked email address.
- Suppression Event: Why the email was blocked.
- Suppressed By: Who blocked the email (the system, the consumer, or an agent).
- Suppressed Date: When the email was blocked.

If you click the “i” tooltip icon next to it, a box will pop up showing any related applicants or if there are no related applicants.
 |  |
Managing Your Suppression List
There are four actions to help manage your Suppression List:
- Delete: Remove a single email from the Suppression List
- Export: Download a CSV file of the emails currently on the Suppression List
- Import bulk emails: Add multiple emails to the Suppression List using a CSV file
- Add single email: Add a single email to the Suppression List
Remove from Suppression List
On the list of emails there is a column that has an option to Delete an email from the Suppression List. When you choose to remove an email from the list, you'll see a specific message based on why it was blocked:
- Bounced Emails: The message will explain that the email was automatically added because it bounced too many times. It will warn that if you unblock it and it keeps bouncing, it will be added back. It will also show any related accounts.
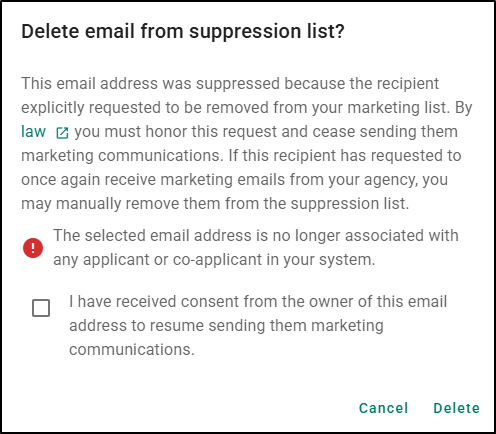
- Unsubscribed Emails: The message will state that the person asked to be removed, and by law, you must honor this. If you got permission from them to email them again, you can check a box, and then click "Remove." It will also mention if there are related applicants.
- Spam Complaints: The message will say the email was marked as spam. It will remind you to think if you'd want to get the email you're sending. You'll need to check a box to confirm you understand that too many spam complaints can lead to your email sending being stopped. It will also show any related accounts.
To remove the email address from the Suppression list, check the consent box and select Delete. You can use the Cancel option to close the confirmation box.
Export Current Suppression List
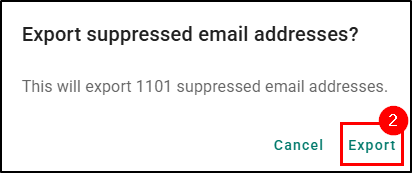
- To export your current Suppression List, select the "Export (#)" button (where # is the total number of blocked emails). The number of emails to be exported will depend on any filters applied.
- A confirmation will display, confirming how many emails will be exported. Click "Export," and a CSV file with all the list details will download.
 |  |
Import Bulk Emails
- To add multiple email addresses to the Suppression List at the same time, select the "Import bulk emails" button. This will take you to the new "Import emails" page where you'll find an explanation of the page's purpose: "To import emails, a file should only contain one column of valid email addresses. Use our template to get started." The word "template" is a clickable link to download an example CSV file.
- Next, upload a CSV file by dragging and dropping or browsing your computer.
- Please note, a Header is required, otherwise, the first email will be omitted. If the file contains information in other columns, it will be ignored.
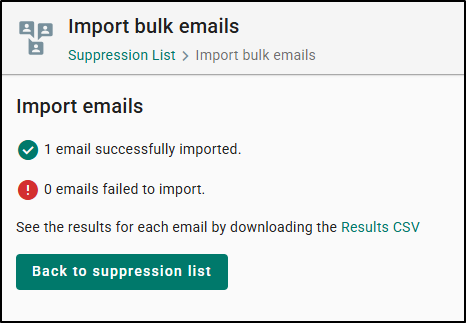
- Once you've uploaded the file, click "Import," a loading sign will appear, and then you'll see a confirmation page.


The confirmation page will tell you how many emails were successfully added and how many were not. You can download the “Results CSV" to see details for each email (like "Email address suppressed", "Email address already suppressed", or "Email format invalid"). You can click "Back to Suppression List" to go back to the main Suppression List page.
Add a Single Email
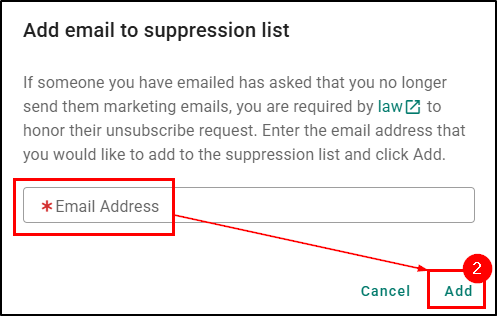
- To add a single email address to the Suppression List, select the "Add single email" button. A confirmation will display, reminding you about laws that say you must stop emailing people who ask you to.
- Type in the email address and click "Add."
 |  |
We hope this workflow article was helpful in learning how to work the Email Campaign Suppression List. Please let us know if this article was helpful by answering the question below. Check out our related articles on the right-side of the page to learn more about EZLynx!
Did you find it helpful? Yes No
Send feedback