Sales Center Setup and Settings
Modified on: Tue, 20 Jan, 2026 at 12:44 PM
Sales Center is a powerful tool to help agencies grow their business by streamlining the sales pipeline. Before using Sales Center, a Sales Center Admin should check the available settings to customize them to fit their agency's needs. In this article, we will cover how to find the different Sales Center settings and explain what they do.
TABLE OF CONTENTS | Check out our video if you'd rather watch and follow along!  |
 | Did you know? - You can click on the images in our article to make them bigger! |
How to access
To access the Sales Center settings for your agency, you must be a Sales Center Admin. To check if you have Admin permissions, hover over the Sales Center icon. If you do not see the Settings option, you do not have Admin permissions and will need to work with your Agency Admin to change Sales Center Settings. If you do see the Settings option, you have Admin permissions and can select it to be taken to the Sales Center Settings page.

General Settings
On the Sales Center Settings page, you will land on the General Settings tab. Under the General Settings tab, you will find the settings for New Opportunity Assignment, Opportunity Automation, and User Settings.

New Opportunity Assignment
When a new opportunity is created in Sales Center, if the customer's account has an Assigned Producer, the Assigned Producer will be assigned the new opportunity. If the account does not have an Assigned Producer, the system will need to know who to assign the new opportunity to.
You can handle the new opportunity assignment in multiple ways which allows you to decide what works best for your agency.
If you have a single person working the sales pipeline, you can use the Default Producer drop-down to select that person as the one who should be assigned any new opportunities.

If you have multiple people working the sales pipeline, then you have two options.
Sales Center Admins are the only ones who can reassign opportunities, so you'll want to set the Default Producer drop-down to a Sales Center Admin so they can reassign the opportunity to the person who should work it.
Alternatively, you can use the Automation Center to create a round robin workflow! This will save you from having to do manual work and help make the assignments as even as possible. Check out our How to Setup a Round Robin for New Sales Center Opportunities article to learn more. If you decide to use the round robin option, make sure to leave the Default Producer drop-down set to None.

Regardless of which option you decide to go with, any user that is assigned an opportunity will get a notification. Check out the Producer Notifications section of this article to learn more.
Opportunity Automation
Sales Center as the ability to automatically create or close opportunities based on certain events that happen in the system. A Sales Center Admin can decide which of these automations to enable for their agency by simply checking the box next to the option they would like to enable. If you would not like the automation enabled, leave the box unchecked. Check out the table below for the current opportunity automations and what they do.
| Opportunity Automation | Definition |
|---|---|
| Create New Opportunities | A new opportunity will automatically be created for every new account added to EZLynx. |
| Create New Opportunities During Quoting | An opportunity will automatically be created when an auto or home quote is completed for an account where those lines of business do not already exist. |
| Move Opportunities with Successful Quotes | When quotes come back as "successful" in a Line of Business that corresponds to their Opportunity, the Opportunity will automatically move into Quoted. |
| Move Opportunities with Unsuccessful Quotes | When quotes come back as "unsuccessful" in a Line of Business that corresponds to their Opportunity, the Opportunity will automatically move into Contacted. |
| Link Policies to Opportunities | An opportunity will automatically be moved to the "won" status when a policy download come in or a new policy is manually entered. |

Recycle from X-Date
Using the Recycle from X-Date section, you have the option to set the number of days prior to the X-Date for both Personal Lines and Commercial Lines Opportunities to recycle back to the New status. By default Personal Lines Opportunities are set for 45 days, and Commercial Lines Opportunities for 60 days.

User Settings
Under the User Settings section, you'll have a few options that will change the default permissions for basic Sales Center users. Simply check the box next to the options you would like to enable. Check out the table below on the options currently available and their definitions.
| User Settings | Definition |
|---|---|
| User Views | All users will have access to see all Opportunities despite assignment. |
| Delete Prospect Lists | Available only if you have prospecting; non-admin users will have the ability to delete Prospect lists in Prospecting. |
| Did you know? - Sales Center Admins can always view all opportunities regardless of who they are assigned to. |

Before moving on to any other section of the Sales Center Settings, make sure to scroll to the bottom of the page and select the Save button to save your preferences.

Producer Notifications
On the Producer Notifications tab, you will find the list of the users that have access to Sales Center and how their Sales Center notifications are setup. When a Sales Center user is assigned an opportunity, they can receive a notification(s) depending on how they are setup.

To customize what type of notification a user will get simply check the box under the type you want the user to receive. To bulk check boxes, select the Select All option and then choose the type of notification you would like everyone on the list to have selected. Check out the table below on the current notification options and their definitions.
| Notification Option | Definition |
|---|---|
| An email will be sent to the user using the email address in their User Settings. | |
| Text | A text will be sent to the user using the phone number in their User Settings. |
| EZLynx Notification | A notification will pop-up in EZLynx in the bottom right-hand side. |
| Unassigned Opportunity | If this option is checked then a user will get a notification if an opportunity is created but not assigned to a user. The type of notification will depend on the options above. |

To ensure notifications are received, each user should review their contact information in EZLynx. To do this, check out our EZLynx Basics - User Settings article.
Before moving on to any other section of the Sales Center Settings, make sure to select the Save button to save your preferences.

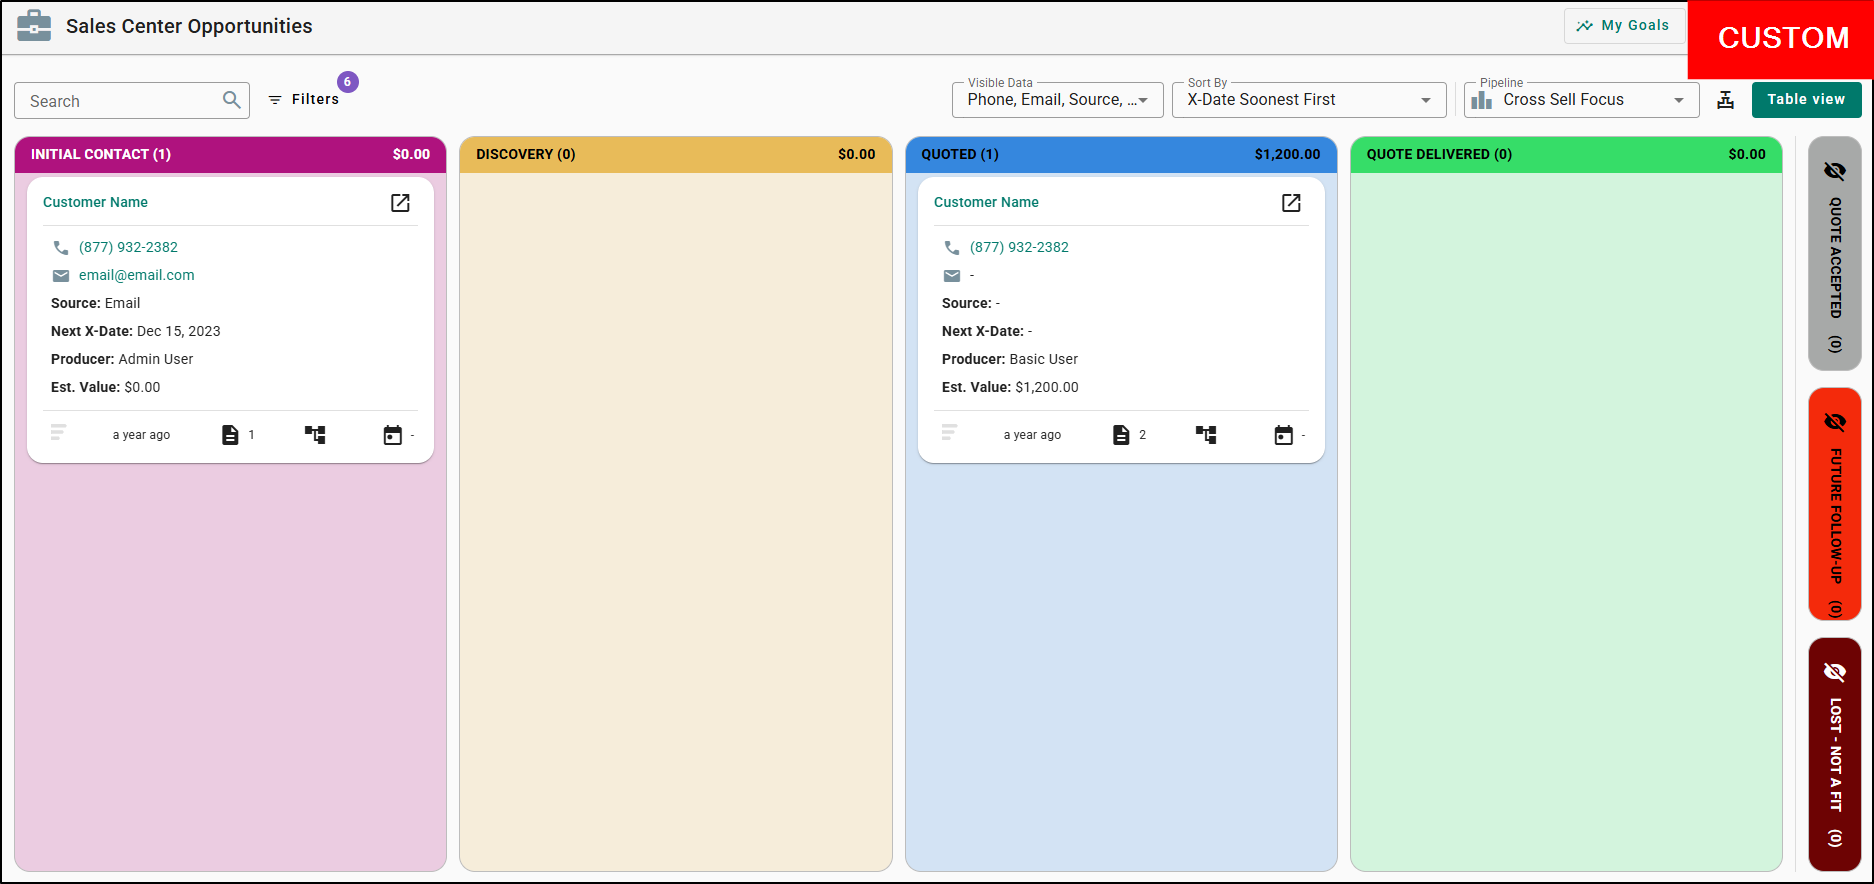
Status Management
Sales Center Admins can now configure your status names within Sales Center, helping you perfectly align your pipeline with your agency's unique process.
To begin customizing your Status names, navigate to Sales Center > Settings > Status Management.
 |  |
If this is your first time viewing this page, you will see the statuses that have been supplied by EZLynx. These status names and colors have been supplied to give a starting point and updating them is optional.
To update the Statuses to custom names and colors, enter the desired name and use the color picker to select the color you would like to show on Card View.
Personalizing your statuses helps your pipeline reflect your unique sales process, making it more intuitive and effective for your team. Remember to save these selections to ensure that they update throughout EZLynx.

Want Names and Colors back to default? Click here!
- Status 1 - New: 255, 217, 102
- Status 2 - Contacted: 128, 202, 255
- Status 3 - Quoted: 57, 204, 178
- Status 4 - Reviewed: 217, 184, 255
- Status 5 - Won: 133, 224, 163
- Status 6 - X-Date: 255, 175, 163
- Status 7 - Dead: 199, 199, 199
Be sure to take note of the statuses that have information about the behavior of that status. Knowing how each status behaves, regardless of their name, is the key to optimizing your workflow. This can help guide the names you choose so that they align with the behaviors of each status.

- Status 1- All new or recycled opportunities will begin here. Opportunities recycle from Status 6 as the X-Date approaches.
- This is your entry point for all new leads, ensuring no opportunity is missed, and allows for automated recycling of X-dated Opportunities.
- Status 2, 3, and 4 - These statuses can be used to help you notate where you are in the quoting process; such as Contacted, Quoted, and Reviewed.
- Status 5- This status indicates the opportunity has been sold. Moving opportunities to this status will be reflected as sold within reports.
- Marking an opportunity as sold provides crucial data for your sales reports, helping you analyze performance and celebrate wins.
- Status 6- Opportunities in this status are recycled to the first stage of your pipeline.
- This is designed to automatically re-engage leads as their X-Date approaches, giving you a renewed chance to win their business.
- Status 7- Moving to this status closes the opportunity. Agency Insights will still generate prospecting suggestions for this applicant.
- It allows you to close out opportunities that aren't moving forward, while still leveraging Agency Insights to identify future potential.
Once you have updated the statuses to custom names, you should see that reflected throughout EZLynx. Your custom statuses will now provide consistent, clear communication across all relevant areas of EZLynx, enhancing your sales process.

Some of the other areas in EZLynx you will see updated based on custom Names include:
- Workspace
- Automation Center
- Reports
- Bulk Actions in Table View
- Opportunity Details
- Activity Log
- System Log
 | Please note: Within the System Log, updates to status names will reflect from that moment forward and will not change any existing items in the System Log. This is to maintain the integrity of data for your applicants. |
We hope this training article was helpful in setting up your Sales Center product. Please let us know if this article was helpful by answering the question below. Check out our related training articles on the right-side to learn more about how to master EZLynx!
Did you find it helpful? Yes No
Send feedback