How to Create Bulk/Drip Email Campaigns
Modified on: Sun, 26 Oct, 2025 at 4:41 PM
With our Email Campaigns product you can create bulk/drip Email Campaigns using the Create New Campaign Workflow, or you can send a single email campaign to up to 5 recipients from the Applicant's Overview page. Using Recipient Lists in combination with Email Campaigns, you can build well-defined recipient lists to send targeted marketing messages. This type of marketing has a high return-on-investment and is well proven to increase new sales, brand awareness, and customer loyalty.
In this article, we will cover how to create bulk/drip Email Campaigns using the Create New Campaign Workflow.
If you are looking to send an Email Campaign to a up to 5 recipients from the Applicant's Overview page, check out our Email Campaigns from Applicant Overview article.
| TABLE OF CONTENTS | Check out our video if you'd rather watch and follow along!  |
 | Did you know? - You can click on the images in our articles to zoom in. |
Before You Get Started
Before you create your first Email Campaign, it's a good idea to set your Reply Email Address and Email Signature in your User Settings. If you haven't already, check out our EZLynx Basics - User Settings article and check out the Email Signature tab.
If you are an Agency Admin, you can also check out our Email Campaigns - Settings for Admins article to setup an Agency Logo for use with the Personalization Tag, Global Signature Settings, and Custom Domains.
Finally, while you can create Recipient Lists from within the Create New Campaign Workflow, if you want to be a step ahead, check out our Recipient Lists for Email Campaigns article.
Start the Create New Campaign Workflow
To start the Create New Campaign Workflow:
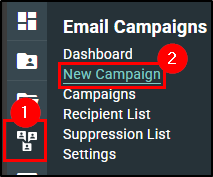
1. Hover over the Communication Center icon.
2. Under the Email Campaigns section, choose New Campaign. This will take you to the Create New Campaign page.
 |  |
Create New Campaign Workflow Overview
At the top of the page, is the Stepper Navigation feature. This streamlined workflow guides you through creating the campaigns, adding recipients, and reviewing and scheduling delivery. You can navigate to the next step in the workflow by selecting these icons or using the Next & Go Back buttons at the bottom of the page.
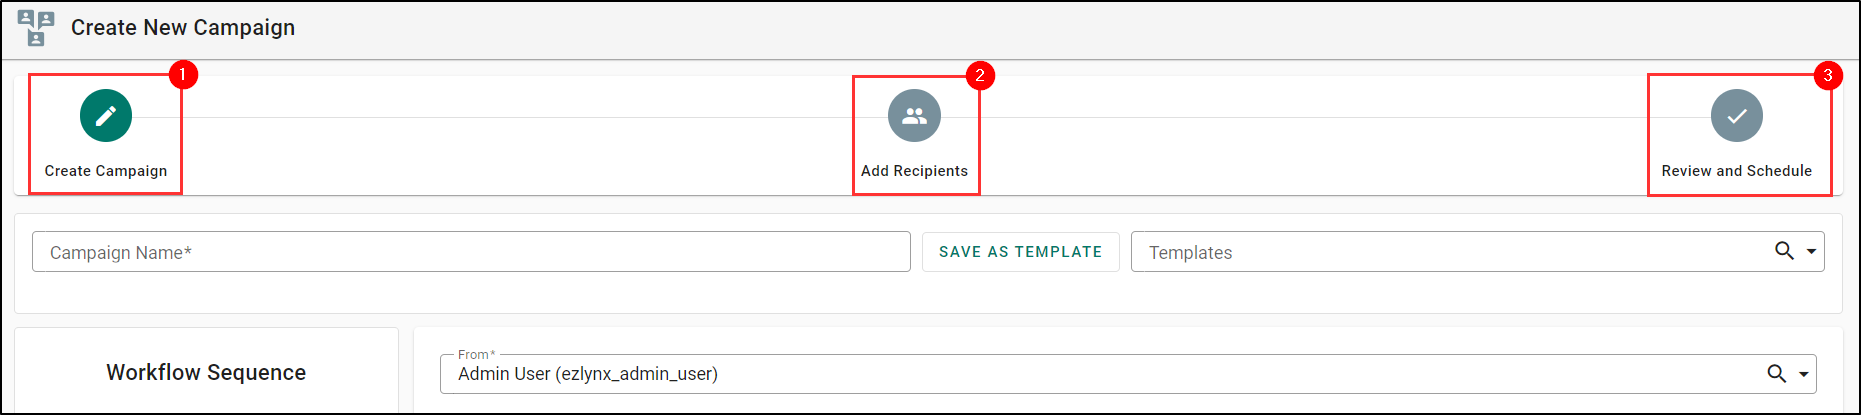
Step 1: Create Campaign
In the Create Campaign step, you can easily enter campaign details, choose templates, and personalize your campaigns with tags, images, and links. You can also create drip campaigns using the Add step in the Workflow Sequence section.
If this is your first time making an email campaign, check out our Email Marketing Best Practices article for more tips on creating effective Email Campaigns.
Input the Basics
1. Provide a Campaign Name. This is something your agency will use to differentiate email campaigns from one another.
2. If you need a good starting place, you can use the Templates drop-down to select from templates your agency has created or from the free ready-to-use templates we've provided.
 | 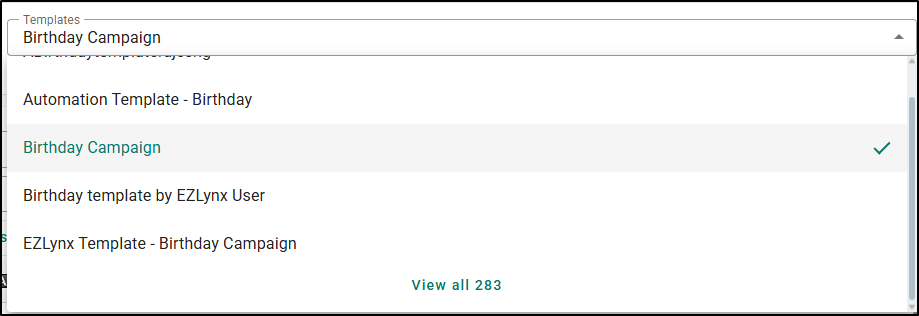 |
 | Please Note - When using the Template dropdown, we are using a combo box that will display only the initial twenty values. You can search for templates by typing, or to view all values, simply scroll to the bottom and select View All. |
3. Use the From dropdown to choose the From Email Address.
4. Input the Reply To email address in the Reply To field.
 |  |
Once you've input the basics, if you ever need to step away to work on something else, you can select the Save as draft button at the bottom of the page to save your work.

Subject Line
Your subject line is the first impression - and often the deciding factor in whether an email gets opened. To maximize engagement, check out these three proven strategies that balance clarity, personalization, and value:
- Keep it concise: The ideal length is between 30 and 50 characters, or 4-7 words. A shorter subject line is easier to read on mobile devices, where a significant portion of emails are opened.
- Personalize it: Using the recipient's name or other personal details can significantly increase open rates. For example, instead of "An important update about your policy," try "John, an important update about your policy."
- Focus on value and benefits: Instead of a generic "Policy documents," a better subject line might be "Review your new policy benefits." Frame the subject line around what the customer gains, such as savings, security, or peace of mind.
Check out our Email Marketing Best Practices article for more tips on creating effective Email Campaigns.
5. Once you have your Subject Line, type it into the Subject field.

Make it Personal with Smart Tags
Did you notice the weird brackets in our Subject Line example above? Those are Smart Tags which can be used in both the Subject Line and the Body of an email. These Smart Tags allow you to prefill personalized information about your customer or your agency like the customers name or customer's assigned agent.


To use a Smart Tag:
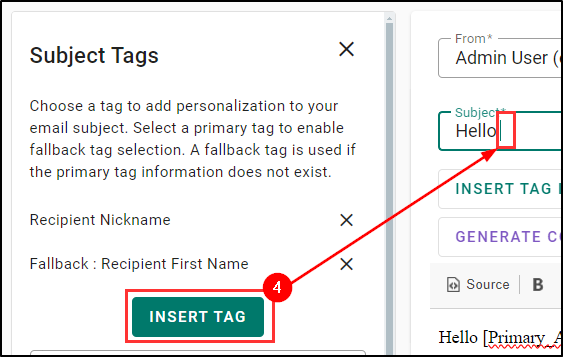
1. Select the Insert subject/body smart tag button. A panel on the left side of your screen will display the list of tags.
2. Choose the primary tag you'd like to use by clicking on an option from the list.
  |  |
3. After choosing your primary tag, it's best practice to choose a fallback tag in case the first option is not available. Select Add fallback tag and choose from the list again or manually type it in the Create Fallback Text field if you can't find a good fit from the list.
 |  |
4. Select Insert Tag.
- When working in the body of an email, tags will be added at the cursor position.
- When working in the subject line, they will appear at the end of each line.
 |  |
| Please Note - If you are working on a multi-step or drip campaign, moving to a different step in the campaign will close the tag panel. Please be sure to insert the tag before moving to the next step. |
Design the Campaign
Creating the body of the email can be both fun and daunting. To help make things easier, you can use the free EZLynx provided pre-built content and designs using the Insert content and Insert design buttons. You can also use the Insert image and Insert link buttons to upload images from your computer or insert links like your agency's website.

Here are a few best practice tips for creating compelling email campaign content:
- Focus on the Reader, Not Yourself: Instead of talking about "our great new product," frame the message around "how this product benefits you." In the insurance space, this means focusing on benefits like:
- Financial Security and peace of mind.
- Protection for your family and assets.
- Cost Savings and exclusive discounts.
- Make it Scannable and Easy to Read: People skim on their phones and have short attention spans. Avoid long dense blocks of text.
- Use short paragraphs: Break up your copy into small, digestible chunks of 1-3 sentences.
- Use bullet points and numbered lists: These draw the eye and help readers quickly grasp key information.
- Use bolded text and headings: Highlight the most important takeaways.
Check out our Email Marketing Best Practices article for more tips on creating effective Email Campaigns.
| Did you know? - If you have our Advanced Package, our EZLynx Virtual Agent (EVA) can help you write content for your email campaigns. Check out our EVA Email Content Assist to learn more! |
Workflow Sequence for Multi-Step/Drip Campaigns
In EZLynx, an Email Campaign can be comprised of up to a maximum of 10 steps. A step is simply an email that is sent automatically at the designated time. A campaign with multiple steps is normally called a Drip Campaign because there are several emails that go out slowly at different dates.
For example:
- First step/email could be sent the day the campaign is started.
- Second step/email is sent a few days later.
- Third step/email is sent a week later.
If you are creating a multi-step/drip campaign, the Workflow Sequence section allows you to add and manage multiple email steps/emails seamlessly. You can set wait times between steps and edit/delete them as needed, allowing you to design comprehensive and flexible campaigns. You can add up to 10 steps in a single email campaign.
To create a new step:
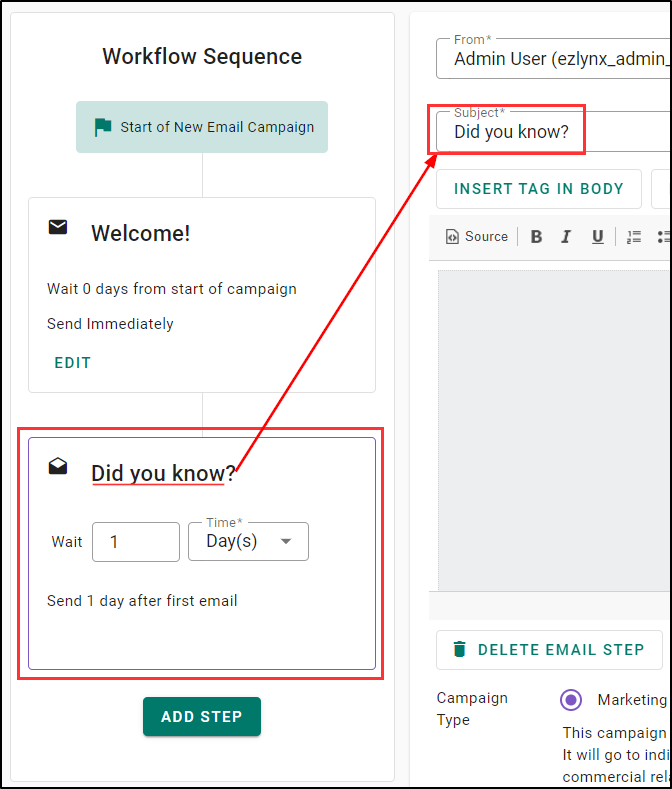
1. To add a step, select the Add Step button. This will add a secondary email to the Workflow Sequence. Each step in the campaign is titled by their Subject line so you can easily tell them apart.
 |  |
2. The Wait Time is how long the system will wait before sending out that step. You can set the wait time using the Time dropdown. When you send your email can be just as important as what's inside it. Strategic timing helps maximize open rates and engagement. Here are some guidelines to consider:
- Best Days: Mid-week, specifically Tuesday, Wednesday, and Thursday are generally considered the sweet spot.
- Best Times: The most common high-engagement windows are:
- Mid-morning (9 AM - 11 AM)
- Lunchtime (12 PM - 1 PM)
- Late Afternoon (2 PM - 3 PM)
Check out our Email Marketing Best Practices article for more tips on creating effective Email Campaigns.

3. To navigate between the steps, select Edit on the step you'd like to work on. The system will save content automatically when navigating between steps, and has validation alerts for required fields such as Campaign Title, Subject Line, and Body Content before moving away from an added step.

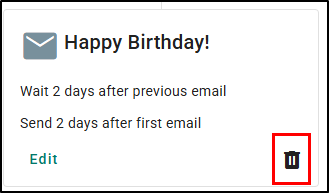
4. If for some reason you need to delete an email step, select the Delete icon (trashcan).
Campaign Types
Once you've created your email campaign, you have to choose the Campaign Type. By default, Email Campaigns are marked as Marketing type. Simply select the toggle next to the Campaign Type that is appropriate. If you are unsure, check out the link in the Marketing type definition to visit the Federal Trade Commission website to read about compliance guidelines.

Send Test Email
If you want to test out how your email looks from the customer's view, you can select the Send test email button at the bottom of the page. This will allow you to send a test email to yourself. If you are testing a drip campaign, you can decide whether to test the entire campaign or a single step.

Single Step Test  | Multi-Step Test  |
Save as Template
If you love your current email campaign so much you want to use it often, select the Save As Template button to save the campaign as a template for your agency. This will then make it available to select from the Templates dropdown anywhere you can create an email campaign.
 |  |
Step 2: Add Recipients
On the Add Recipients step, you can choose an existing Recipient List or search for individual recipients to add to the Email Campaign. The success of a campaign starts with sending the right message to the right people. Use the powerful Recipient List feature to build lists based on a variety of customer data points to ensure relevance.
No Recipient Lists
If you haven't created a Recipient List yet, you can select the Create new recipient list button. This will start the Create New Recipient List Workflow. The best part, once you have finished making your list, you'll be navigated right back to the Add Recipients step so you can pick up where you left off. Check out our Recipient Lists for Email Campaigns article to learn more about creating Recipient Lists. |  |
Add Recipients
- To add an existing Recipient List to the campaign, select Add next to the list.
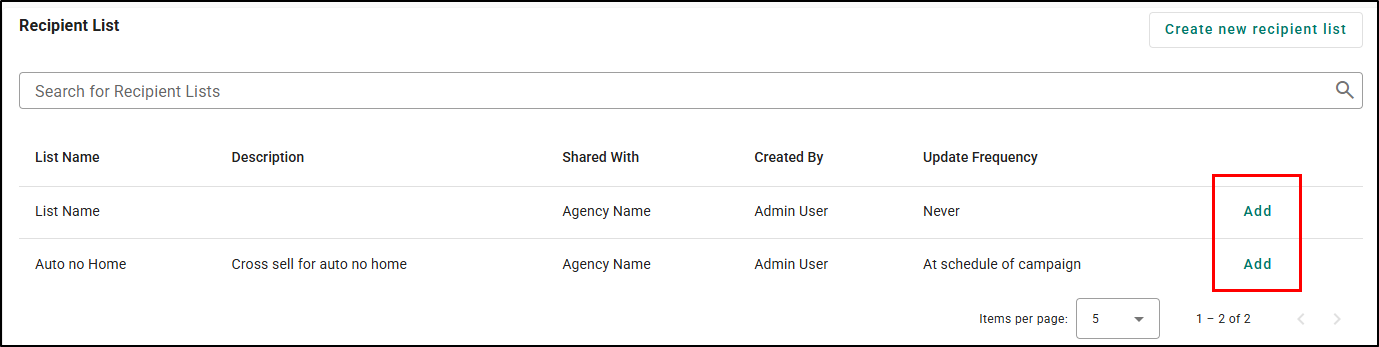
- Use Search for Recipients to find a individual customer and select Add next to their name.
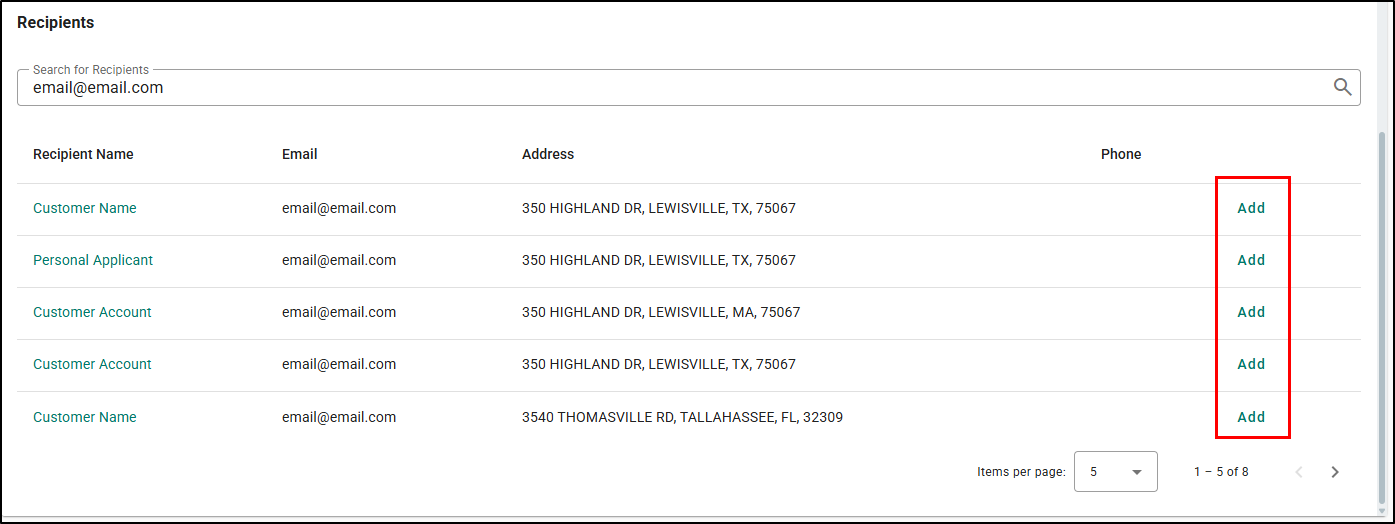
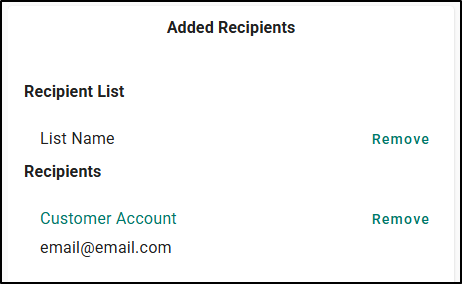
When you've added a recipient(s) to the campaign, you'll see them displayed on the left panel under Added Recipients. If they were added by accident, you can select Remove and it will remove them from the campaign.
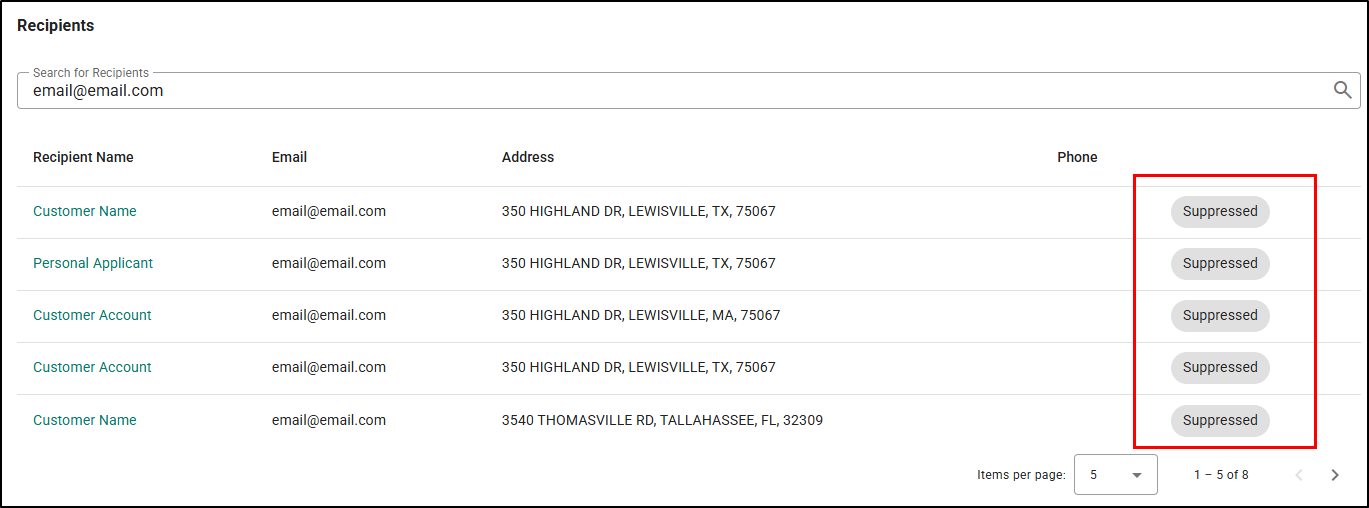
Suppressed Chip
When you are searching for an individual recipient, the system will display whether or not the account is on the Email Campaigns Suppression List. If they are on the Suppression List there will be a Suppressed chip next to their line item and you will be unable to add them to the recipient list. This means they have unsubscribed from getting any more email campaigns from your agency or emails have bounced so many times that the system has flagged it as a bad email address.
Update an Email Address
| If you notice an email address needs to be updated, you can select the Recipient's name. This will will open a new browser tab and take you to that customer's Details tab where you can update the email address. Once you've updated the email address, you can come back to the browser tab that has your Email Campaign, refresh the browser tab, and again see the real-time updates feature work its magic. |  |
Step 3: Review and Schedule
The Review and Schedule step allows you to thoroughly check the entire campaign workflow, including steps, details, and recipients. Any necessary edits can be made directly from this page by selecting Edit on the respective cards:
- Campaign Details - Selecting Edit will take you back to the first step Create Campaign
- Recipients - Selecting Edit will take you back to the second step Add Recipients
- Workflow Sequence - Selecting Edit will take you back to the first step Create Campaign
Once you've made any necessary changes, you can come back to the Review and Schedule step quickly by selecting the Review and Schedule stepper at the top of the page.

Schedule Date and Time
The scheduling option ensures campaigns can be set to launch at specific dates and times, with the system preventing the selection of past dates.
- Use the Schedule For field to type in the date or select the Calendar Icon to bring up the Calendar Menu to select the date you want the Campaign to start on.
- Use the Time field to type in the time you want the Campaign to start on.
 |  |
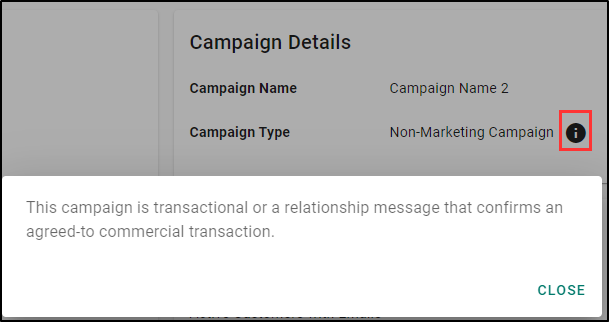
Campaign Type Disclaimers
Additionally, you must certify and accept disclaimers for non-marketing campaigns, ensuring you understand and comply with legal requirements. The system updates marketing messages to align with federal laws, helping you avoid legal pitfalls and maintain compliance. You can check out the disclaimers by selecting the Information icon next to the Campaign Type.
 |  |
Campaign Charges
Finally, you must confirm campaign charges and accept the cost. Check out the Campaign Charges box to see the full breakdown.
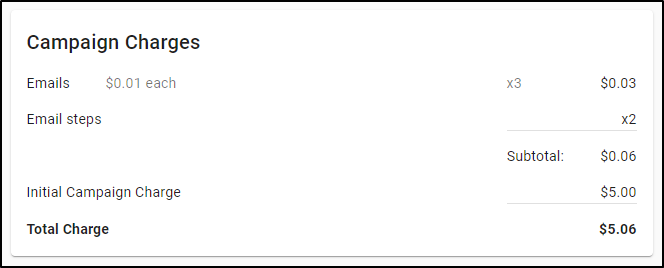
| Please Note - The Campaign Charges box is dependent on the Recipient Threshold set when Email Campaigns is configured. If you do not see this box, it means you do not have enough recipients on the email campaign to incur a charge. |
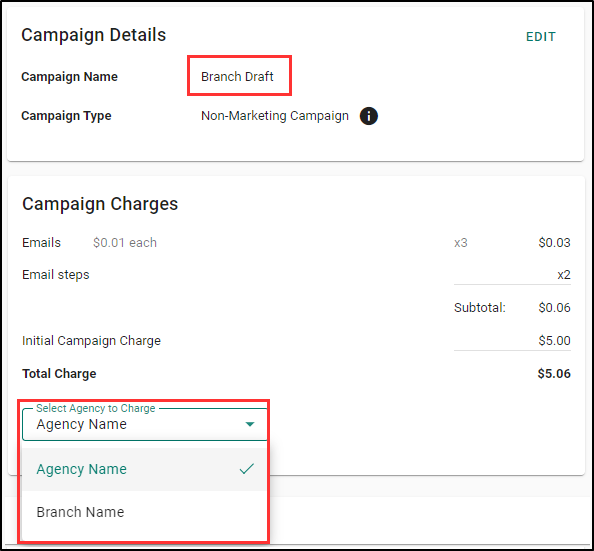
Branch Campaigns
If you are accessing an Email Campaign that was started at a branch location, you can choose the correct agency to be charged by using the Agency to Charge drop-down.
Schedule Campaign
Once you are ready to send out the Campaign, select the Schedule button at the bottom of the page. The page will refresh and take you to the Campaigns Overview page.

We hope this workflow article was helpful in learning how to create bulk/drip Email Campaigns. Please let us know if this article was helpful by answering the question below. Check out our related articles on the right-side of the page to learn more about EZLynx!
Did you find it helpful? Yes No
Send feedback