Email Campaigns Setup and Settings
Modified on: Sun, 26 Oct, 2025 at 3:57 PM
Requirements
|
With our Email Campaigns product you can create bulk/drip Email Campaigns using the Create New Campaign Workflow, or you can send a single email campaign to up to 5 recipients from the Applicant's Overview page. As an Agency Admin, you have the ability to upload an agency logo, set signatures for your agency as a whole and set Custom Domains for your agency to help your agents when creating Email Campaigns.
In this article, we will cover how an Agency Admin can setup certain settings for Email Campaigns.
TABLE OF CONTENTS | Check out our video if you'd rather watch and follow along!  |
 | Did you know? - You can click on the images in our articles to zoom in! |
Upload Agency Logo
This setting gives you the opportunity to add an Agency Logo and share it with your subs/branches if needed. Once an Agency Logo is uploaded, everyone in the agency can then utilize the Agency Logo Smart Tag to easily add the branding to their Email Signature and/or Email Campaigns. Check out the "Make it Personal with Smart Tags" section of our How to Create Bulk/Drip Email Campaigns to learn more about Personalization Smart Tags.
To upload an Agency Logo for your agency:
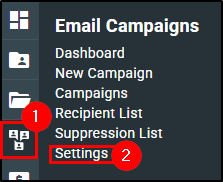
1. Hover over the Communication Center icon.
2. Under Email Campaigns, choose Settings. This will take you to the Email Campaigns Settings page.
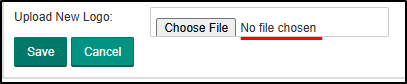
3. Under the General Preferences tab, select the Choose File button. This will open your computer's file explorer. 4. Find the image file you would like to use. Currently, the supported file types are:
- GIF
- JPEG
- BMP
- PNG
 | Please Note - The max file size is 1MB. We highly recommend not going over this max file size and to test the logo using the Send Test Email Campaign option on the Create Campaign step to make sure the logo is an appropriate size before sending it out to your customers. |

5. Once you have selected the file you want to use, the Choose file section will update to say the name of your file. Then, select the Save button. This should refresh the screen and a Current Logo section will appear displaying your image.
  |  |
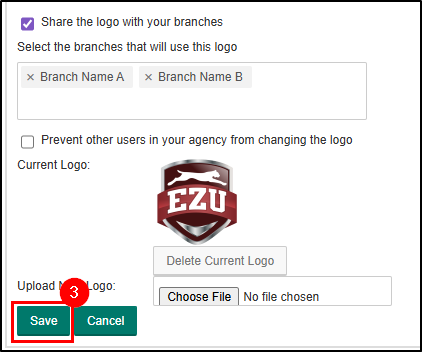
Share Agency Logo
Once the logo is uploaded, you have option to share the logo with your branches if needed. You can also prevent users in your agency and/or branches from changing the logo to a different one.
To share the logo with your branches:
1. Check the box next to "Share the logo with your branches" option.
2. Use the "Select the branches that will use this logo" drop-down to choose which branch(es) location you want to share the logo with.
3. Select the Save button at the bottom of the Agency Logo section to save your changes.
 |  |
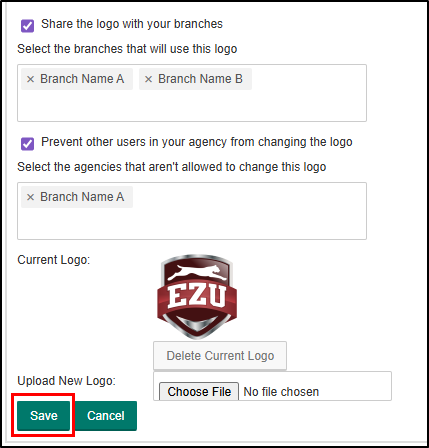
To prevent others from changing the logo:
1. Check the box next to "Prevent other users in your agency from changing the logo" option.
2. Use the "Select the agencies that aren't allowed to change this logo" drop-down to choose which branch(es) location you want to prevent from changing the logo.
3. Select the Save button at the bottom of the Agency Logo section to save your changes.
| Please Note - This setting will be unavailable if you have not shared the logo with another location. |
 |  |
Set Global Signature
Before you send an email campaign, it is best practice to set the email address for replies and what your signature will look like. All users can do this in the User Settings under their Profile icon. Check out the "Email Signature" section of our EZLynx Basics - User Settings article to learn more.
However, as an Agency Admin, you have the ability to set a signature for the entire agency which is called a "Global Signature".
| Please Note - The Email Signature Settings in Email Campaigns are the same Email Signature Settings found in the User Settings under your Profile icon. If you change one, it will automatically update the other one. |
To set a Global Signature:
1. Hover over the Communication Center icon.
2. Under Email Campaigns, choose Settings. This will take you to the Email Campaigns Settings page.

3. Under the General Preferences tab, select the Modify button under the "User Settings - For All Campaigns Started By You" section.

4. Once you have the signature designed how you would like, under the Global Settings section, check the box next to the "Use this signature as the default for all in my agencies" option. This will display a new dropdown.
5. Use the dropdown to choose which locations you would like to use the Global Signature.
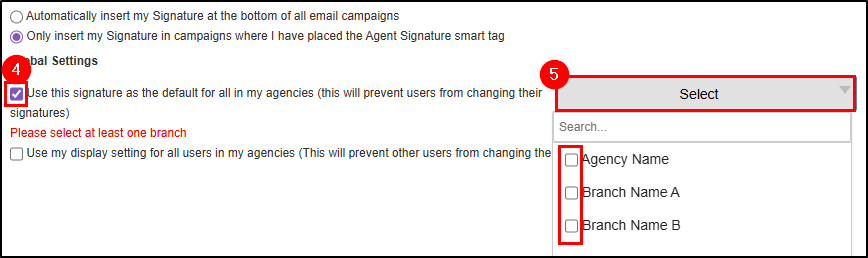
6. Select the Save button to save your changes.

| Please Note - Enabling this setting will prevent users from changing their signatures at the location you specify. |
Setup Custom Domains
By default, emails sent from EZLynx are sent using agent@agencyinbox.com. This is because we do not have permission to send emails out using your agency's email address. This might confuse some recipients or cause emails to be flagged as spam. To improve email deliver-ability, an Agency Admin can add a Custom Domain so that the emails will display your email address instead.
| Please Note - This is an advanced option that will require you or your hosting provider to make changes to the DNS records associated to your domain. This option is only available for use with domains that you control. As a result, you cannot use this feature with third-party email addresses like @gmail.com or @yahoo.com. |
To setup Custom Domains:
1. Hover over the Communication Center icon.
2. Under Email Campaigns, choose Settings.

3. Select the Custom Domains tab.
4. Select the Add Domain button.

5. Under Step One - Add Domain, input your domain into the domain.com box.
6. Select the Next button.

7. Under Step Two - Validate Changes, copy the DNS records and either provide them to your domain registrar or the company that manages your agency's website.
8. Select Save and Validate Later.

| Please Note - Each domain registrar (the company that the agency used to purchase the custom domain) handles the adding of the DNS records differently. EZLynx does not provide any support related to actually adding the DNS records to the domain registrar's website. For this type of support, it is necessary to contact the domain registrar or the company that manages your agency's website. |
9. Once your domain registrar has inputted the DNS records on their end, come back into Step Two - Validate Changes and select the Validate button. You will see green check marks if everything has connected correctly.

| Please Note - The Custom Domains feature will not change the from email for the eSignature feature because those emails are being sent from a vendor. The eSignature emails will always be from notifications@assuresign.com. |
Tips on CNAME Records
Sometimes it's needed to shorten the CNAME records depending on the Domain Provider.
If they do not validate entering them in like this:
em.oldinsuranceinc.com
s1._domainkey.oldinsurance.com
s2._domainkey.oldinsurance.com
Please add them like this:
em.
s1._domainkey.
s2._domainkey.
For GoDaddy, please consider adding them like this:
(Without the "." at the end if it doesn't validate with the ".")
em
s1._domainkey
s2._domainkey
OR
http://em.oldinsurance.com
s1._domainkey
s2._domainkey
For SquareSpace connected through GoDaddy,
Host Fix:
em (only- no domain added);
s1._domainkey (don't add domain);
s2._domainkey (don't add domain)
We hope this settings article was helpful in learning how to setup Email Campaigns settings to help your agency when creating bulk/drip email campaigns. Please let us know if this article was helpful by answering the question below. Check out our related articles on the right-side of the page to learn more about EZLynx!
Did you find it helpful? Yes No
Send feedback