Modernized and Streamlined Email Campaigns
Modified on: Sun, 26 Oct, 2025 at 5:20 PM
With this release we are excited to introduce a comprehensive redesign of the EZLynx Email Campaign product, addressing significant user pain points and enhancing overall efficiency.
We focused on a user-friendly interface, streamlined workflows, and advanced personalization options. These updates aim to optimize the campaign creation and management process, and are expected to reduce operational complexity, improve user satisfaction, and ultimately drive better business outcomes.
TABLE OF CONTENTS | Check out our new updated video! |
 | Did you know? - You can click on the images in our articles to make them bigger! |
What's in this for me?
This update to EZLynx’s Email Campaign product introduces a modern, efficient workflow and enhances usability. By streamlining the campaign creation process and providing robust features for personalization and recipient management, you can now focus more on your core duties, ultimately driving better customer engagement and business growth. These enhancements reflect our commitment to delivering tools that empower you to succeed in your role and improve overall business outcomes.
- User-friendly interface reduces the learning curve and frustration.
- Streamlined email campaign process saves time.
- Allow you to be proactive. It helps win more new business, helps increase cross-sells, and helps retain customers.
- You can leverage the new functionality in the email campaign to manage personalized marketing and non-marketing initiatives.
- The customization capabilities can be potentially implemented as part of the Customer Relationship Management (CRM) strategy at your agency.
Accessing the updated Create New Campaign
1. Hover over the Communication Center icon.
2. Choose New Campaign. This will refresh the page and take you to the new Create New Campaign page.
 |  |
Stepper & Button Navigation
We've updated our email campaign creation process with a new Stepper Navigation feature at the top of the page. This streamlined workflow guides you through creating the campaigns, adding recipients, and reviewing and scheduling delivery. You can navigate to the next step in the workflow by selecting these icons or using the Next & Go Back buttons at the bottom of the page.

You'll also find it easier to navigate with the buttons at the bottom of the screen ensuring a smoother experience from start to finish.
| Button | Purpose | Screenshot |
|---|---|---|
| Go Back | This button moves you back to the previous step in the workflow. |  |
| Cancel | This button will redirect you to the Campaigns Overview page. |   |
| Send Test Email (Single Step) | This button allows you to send a test email to yourself so you can see what the campaign will look like to your customers. |   |
| Send Test Email (Multiple Steps) | This is the same button as above but looks slightly different when you have multiple steps in the campaign. It lets you decide if you want to test the entire campaign or just the campaign step you are on. |   |
| Save as Draft | This button allows you to save your email campaign as a draft so you can continue work on it later from the Communication Center > Drafts page. |   |
| Next | This button moves you to the next step in the workflow. |  |
Create Campaign
We have improved our campaign creation process with new features designed to provide better customization and efficiency. Now you can easily enter campaign details, choose templates, and personalize your campaigns with tags, images, and links.
Insert Campaign Details
You can insert campaign designs, content, image or links using the easily to find respective buttons. Just to clarify, we did not change the experience for the Insert Content and Insert Design in this update. Only the Insert Image and Insert Link's UI has been updated this release.

 |  |
Generate Content with EVA
Our integrated EVA tool helps you create content quickly. Check out our EVA Email Content Assist article to learn more!

Defined Campaign Types
The campaign types have clear definitions ensuring compliance with appropriate disclaimers.

Template Selection
Use the Template dropdown to easily search and apply a template to the campaign.

When selecting a From email address or email template, we are using a combo box that will display only the initial twenty values. To view all values, simply scroll to the bottom and select View All.

If you love your current email campaign so much you want to use it often, select the Save As Template button to save the campaign as a template for your agency.


Insert Tags in Subject and Body
We've improved the workflow when adding tags to your email subject and body, enhancing your experience.
1. Select the Insert Tag in Body or Subject button. A panel on the left side of your screen will display the list of tags.
2. Select the primary tag you'd like to use by choosing an option from the list on the left panel.

3. After choosing your primary tag, you will have the option to either insert the primary tag directly or choose a fallback tag. If you opt for a fallback tag, choose Add Fallback Tag. You can then choose from the list again or manually type it in the Create Fallback Text field.
 |  |
4. When you are ready to insert the tag, select Insert Tag. When working in the body area, tags will be added at the cursor position. In the subject field, they will appear at the end of each line.
 |  |
 | Attention! - Keep in mind that moving to the next step will automatically close the tag panel, so be sure to insert your tag before moving to the next step of building a campaign. |
Workflow Sequence for Multi-Step Campaigns
For multi-step campaigns, the new workflow sequence allows you to add and manage multiple email steps seamlessly. You can set wait times between steps and delete them as needed, allowing you to design comprehensive and flexible campaigns.
1. You can create multi-step email campaigns by adding up to 10 steps. To add a step, select the Add Step button. This will add a secondary email to the workflow sequence. Each step in the campaign is titled by their Subject line so you can easily tell them apart.
 |  |
2. You can set the wait time between steps to be days or weeks using the Time dropdown.

3. To navigate between the steps simply select Edit on the step you'd like to work on. The system will save content automatically when navigating between steps. This enhancement ensures that complex campaigns can be managed efficiently, with validation alerts for required fields such as Campaign Title, Subject Line, and Body Content before moving away from an added step.

4. If for some reason you need to delete an email step, select the Delete Email Step button near the bottom of the page next to the Campaign Type section.

Add Recipients
Using the new powerful Recipient Lists which were released in a previous release, you can quickly select recipients from existing Recipient Lists or manually add individual recipients. We've enhanced the system to provide real-time updates and validation for duplicates and suppressed emails, ensuring the recipient list is accurate and compliant.
No Recipient Lists
If you haven't created a Recipient List yet, you can select the Create new recipient list button. This will start the Create New Recipient List Workflow. The best part, once you have finished making your list, you'll be navigated right back to the Add Recipients step so you can pick up where you left off. Check out our Recipient Lists for Email Campaigns article to learn more about creating Recipient Lists. |  |
Add Recipients
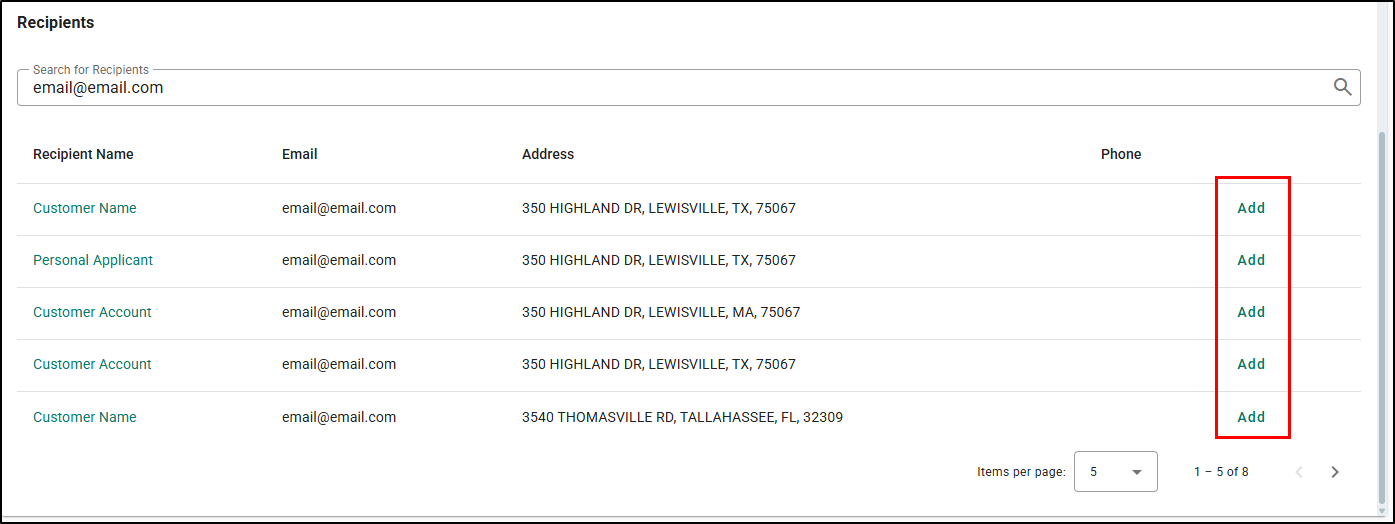
- To add an existing Recipient List to the campaign, select Add next to the list.

- Use Search for Recipients to find a individual customer and select Add next to their name.

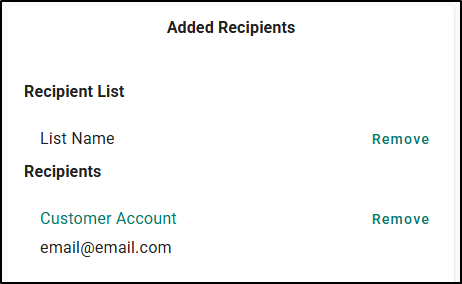
When you've added a recipient(s) to the campaign, you'll see them displayed on the left panel under Added Recipients. If they were added by accident, you can select Remove and it will remove them from the campaign.

When you are searching for an individual recipient, you'll notice we've updated the system to showcase whether or not the account is on the Email Campaigns Suppression List. If they are on the Suppression List there will be a Suppressed chip next to their line item and you will be unable to add them to the recipient list. This means they have unsubscribed from getting any more email campaigns from your agency or has bounced so many times that the system has flagged it as a bad email address.

| If the email address needs to be updated, selecting the Recipient's name will open a new browser tab and take you to that customer's Details tab where you can update the email address. Once you've updated the email address, you can come back to the browser tab that has your Email Campaign, refresh the browser tab, and again see the real-time updates feature work its magic. |  |
Review and Schedule
The review page allows you to thoroughly check the entire campaign workflow, including steps, details, and recipients. Any necessary edits can be made directly from this page by selecting Edit on the respective cards:
- Campaign Details - Selecting Edit will take you back to the first step Create Campaign
- Workflow Sequence - Selecting Edit will take you back to the first step Create Campaign
- Reports and Recipients - Selecting Edit will take you back to the second step Add Recipients
Once you've made any necessary changes, you can come back to the Review and Schedule step quickly by selecting the Review and Schedule stepper at the top of the page.

The scheduling option ensures campaigns can be set to launch at specific dates and times, with the system preventing the selection of past dates. Use the Schedule For field to type in the date or select the Calendar Icon to bring up the Calendar Menu to select the date you want the Campaign to start on. Use the Time field to type in the time you want the Campaign to start on.
 |  |
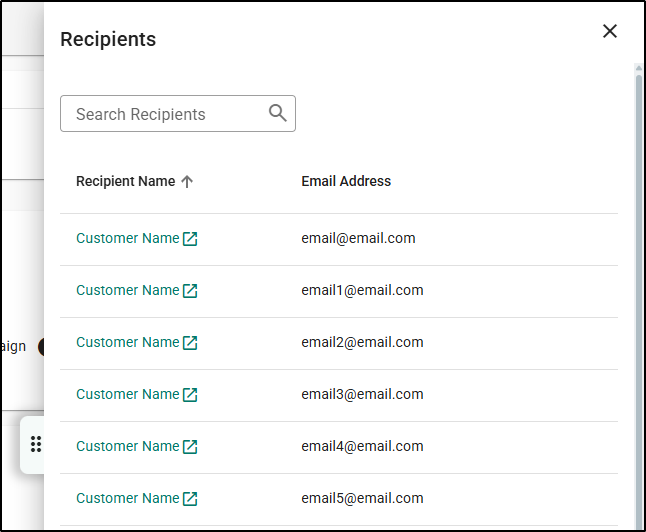
Before scheduling your campaign, you can now view all recipients for the selected campaign in a side panel in Step 3: Review and Schedule. This panel allows you to search for recipients, see their name and email, and even open their account in a new tab. The recipient count updates dynamically based on your selected recipient list.
 |  |
Additionally, you must certify and accept disclaimers for non-marketing campaigns, ensuring you understand and comply with legal requirements. The system updates marketing messages to align with federal laws, helping you avoid legal pitfalls and maintain compliance. You can check out the disclaimers by selecting the Information icon next to the Campaign Type.
 |  |
Finally, you must confirm campaign charges and accept the cost. Check out the Campaign Charges box to see the full breakdown.

 | Attention! - The Campaign Charges box is dependent on the Recipient Threshold set when Email Campaigns is configured. If you do not see this box, it means you do not have enough recipients on the email campaign to incur a charge. |
If you are accessing an Email Campaign that was started at a branch location, you can choose the correct agency to be charged by using the Agency to Charge drop-down.

Once you are ready to send out the Campaign, select the Schedule button at the bottom of the page. The page will refresh and take you to the Campaigns Overview page.

We hope you are excited for this upcoming feature and look forward to future releases. Check out the related articles on the right side to learn more about EZLynx!
Did you find it helpful? Yes No
Send feedback