Email Campaigns from Applicant Overview
Modified on: Fri, 24 Oct, 2025 at 10:05 PM
With our Email Campaigns product you can create bulk/drip Email Campaigns using the Create New Campaign Workflow, or you can send a single email campaign to up to 5 recipients from the Applicant's Overview page. Using Recipient Lists in combination with Email Campaigns, you can build well-defined recipient lists to send targeted marketing messages. This type of marketing has a high return-on-investment and is well proven to increase new sales, brand awareness, and customer loyalty.
In this article we will cover how to send a single email campaign to up to 5 recipients from the Applicant's Overview page.
If you are looking to send a bulk/drip email campaign, check out our How to Create Bulk/Drip Email Campaigns article.
TABLE OF CONTENTS |
 | Did you know? - You can click on the images in our article to zoom in! |
Before You Get Started
Before you create your first Email Campaign, it's a good idea to set your Reply Email Address and Email Signature in your User Settings. If you haven't already, check out our EZLynx Basics - User Settings article and check out the Email Signature tab.
If you are an Agency Admin, you can also check out our Email Campaigns - Settings for Admins article to setup an Agency Logo for use with the Personalization Tag, Global Signature Settings, and Custom Domains.
Start the Applicant Email Campaign Workflow
To start the Applicant Email Campaign Workflow:
1. Navigate to a customer's Overview page.
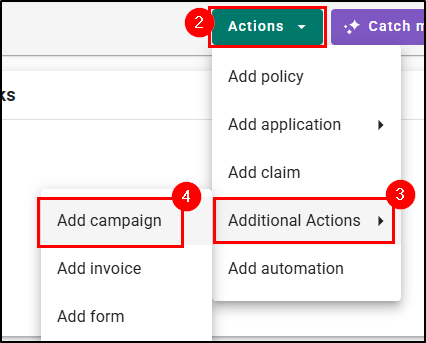
2. Select the Actions button.
3. Hover over Additional Actions.
4. Choose Add Campaign. This will open the Start a New Campaign drawer panel.
 |  |
Input the Details
When creating a new campaign from the Applicant Overview page, you will see a Start a New Campaign drawer panel with the following required fields:
- From: Auto-filled with the logged-in user but can be changed it need be.
- Templates: Select from a list of available templates. If no template is chosen, you'll see "No template selected." under the Template Steps section.
- Send To: Allows you to select specific recipients from the account's available contacts to a maximum of 5 recipients.
- Selected Recipients:
- Status: Displays whether or not the selected recipient is on the Suppression List or not.
- Customer's Name
- Customer's Email
- Delete icon: Removes the respective recipient
- Important: You can select up to 5 recipients. If more than one recipient is selected, the "Birthday Campaign" and "Yearly Recurring Campaign" options are automatically disabled. More on these options later in the article.
- Schedule:
- Schedule For: Choose a date to send the campaign
- Time: Choose a time to send the campaign.

Template Steps
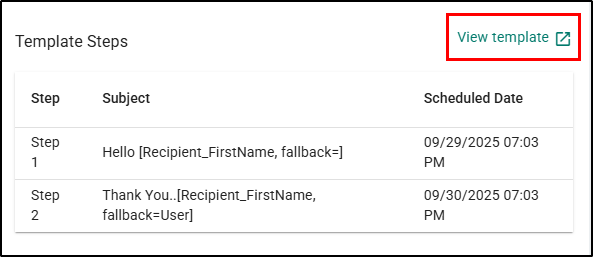
Once you've selected a template, under Template Steps, you'll see the step(s) included in the chosen template.
Each step includes:
- Step: The number of step that email is associated to
- Subject: The subject of the email in that step
- Scheduled Date: The date and time that email step is scheduled to send

There is also a View Template link which opens the template in a new tab with applied filters for review before sending.
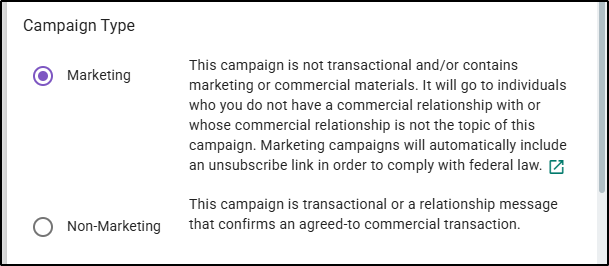
Campaign Types
Underneath the Templates Steps section is the Campaign Type section which allows you to choose if the campaign is a Marketing or Non-Marketing campaign.
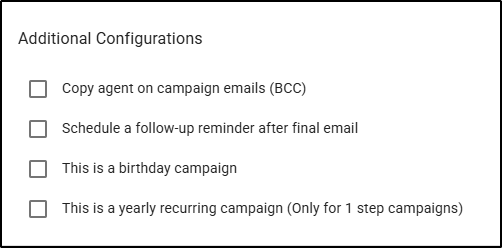
Additional Configurations
Underneath the Campaign Type section, you'll find an Additional Configurations section which includes the following options:
- Copy agent on campaign emails (BCC)
- Schedule a follow-up reminder after final email
- This is a birthday campaign
- Only for email campaigns with 1 step and 1 recipient.
- Selecting this option will remove the start campaign date and time given that the campaign will be sent on the Applicant's birthday.
- If the applicant doesn't have a birthday you will receive an alert indicating that they need to set the campaign start date.
- This is a yearly recurring campaign (Only for 1 step campaigns)
- This option is disabled if "This is a birthday campaign is selected or there are multiple steps.
Check the box on any of the configurations you'd like to include.
Schedule the Campaign
At the bottom of the drawer panel, you'll find two buttons.
- Schedule: This button will schedule your campaign.
- Cancel: This will close the drawer panel. Please note, this will lose any selections you had already selected and you will need to start again, if you did not send the email out before clicking Cancel.

We hope this workflow article was helpful in learning how to schedule an Email Campaign from the Applicant Overview page. Please let us know if this article was helpful by answering the question below. Check out our related articles on the right-side of the page to learn more about EZLynx!
Did you find it helpful? Yes No
Send feedback