Deep Dive into eSignature Fields
Modified on: Tue, 29 Sep, 2026 at 11:50 AM
When you're building an eSignature envelope, the Setup Signature step shows you a panel of field types you can drop onto your documents. Each one asks something a little different of your recipient - a drawn signature, a typed date, a dropdown choice - and each has its own setup options.
This article walks you through every eSignature field type: what it does, how to configure it, what your recipient sees, and a few tips to help you choose the right field for the job.
If you're looking for the full envelope workflow - adding documents, setting up recipients, scheduling expiration - check out eSignature: How to Create and Send an eSignature Envelope. If you want to see the signing experience from the recipient's side start to finish, see eSignature - How does a Customer Sign eSignature?
TABLE OF CONTENTS | Check out our video if you want to watch and follow along! |
 | Did you know? - You can click on the images/gifs in our articles to zoom in! |
Before You Start: Options You'll see on Most Fields
To place any eSignature field:
1. Choose the correct recipient from the dropdown.
2. Click the field type you want.
3. Click on the document where you want it placed.
You can click and drag the field to reposition it, or click and drag one of the black corner handles to resize it. Hover over a field and click Edit to open it's customization options.
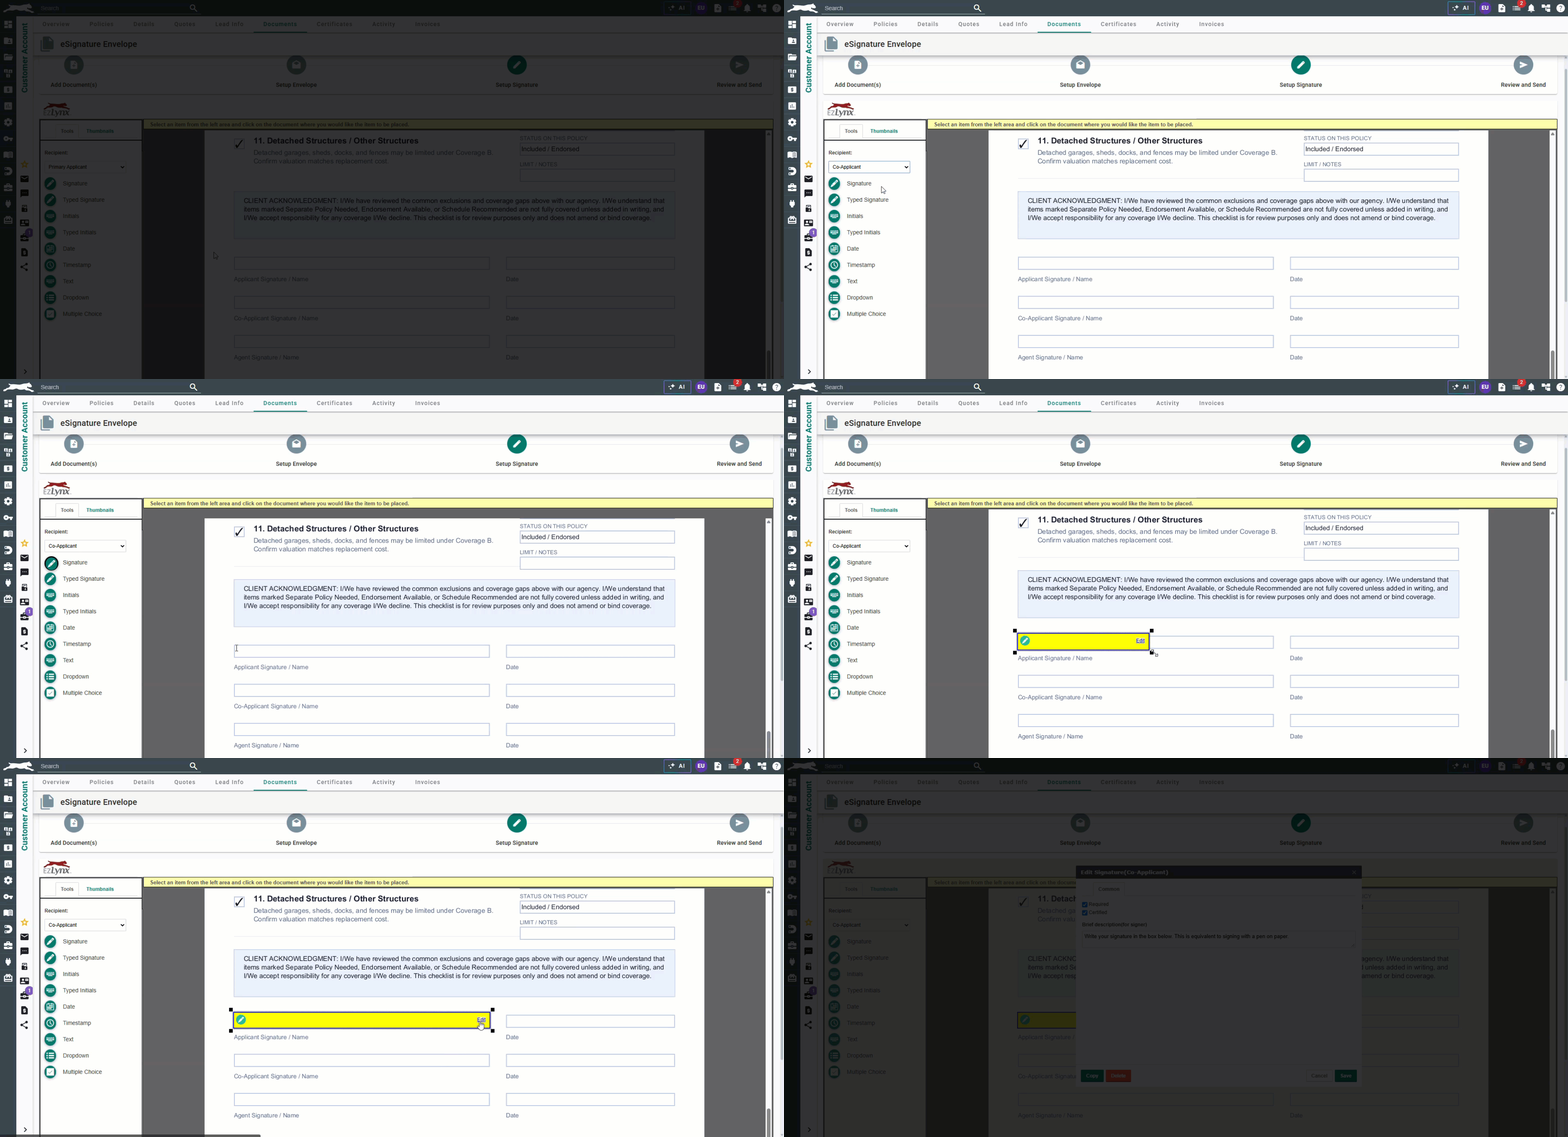
Most fields share three settings:
| Option | What it does |
|---|---|
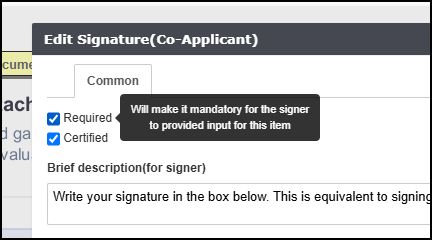
| Required | Makes the field mandatory - the recipient can't submit the document without completing it. |
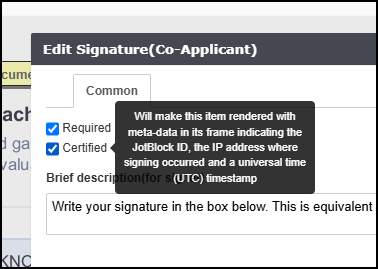
| Certified | Captures metadata when the field is signed, including the recipient's IP address and a Universal Time (UTC) timestamp. |
| Brief Description | A short prompt shown to the recipient explaining what they are answering or how to sign the field. |
You can hover over Required and Certified in the Edit window to see their full definitions. Each field type below has its own defaults for these options - we'll call those out as we go.
 |  |
 | Best Practice Tip - Use the Brief Description box generously, especially on Text, Dropdown, and Multiple Choice fields. It's the only context your recipient gets for what they are answering, so a clear prompt cuts down on signer confusion (and follow-up questions to you). |
Signature
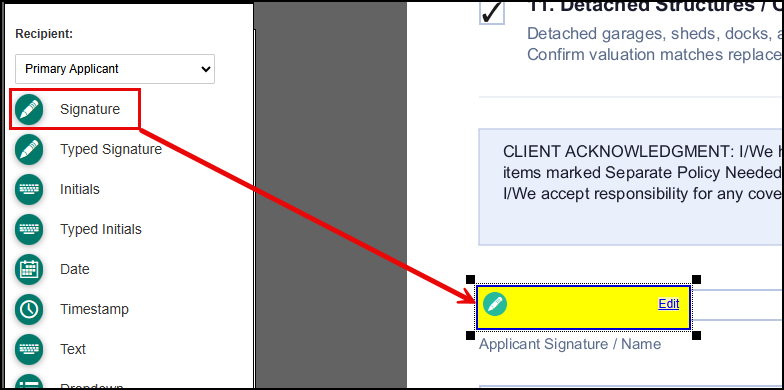
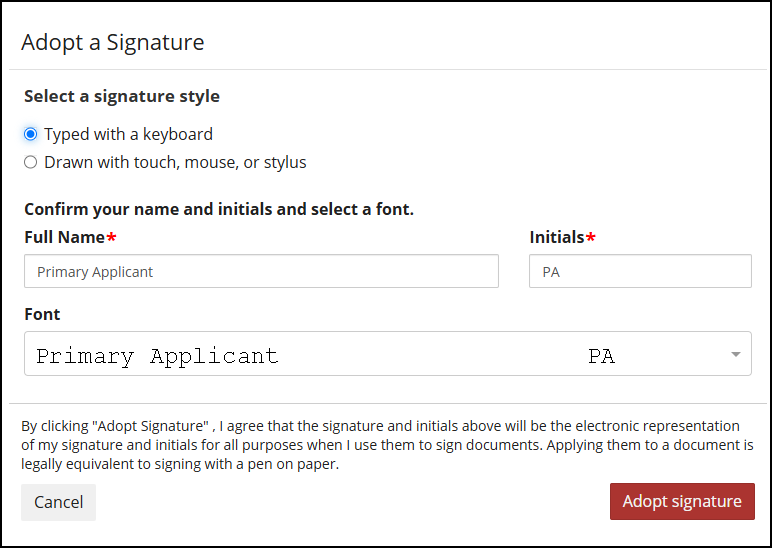
The Signature field asks your recipient to create their signature using their mouse (drawing it) or by typing it with their keyboard - both options are available on the same field.
Setup:
- Signature works together with all other Signature fields on the document - meaning if a recipient adopts their signature once, it can be easily applied across every Signature field on the document (more on this in the Signature vs. Typed Signature section below).
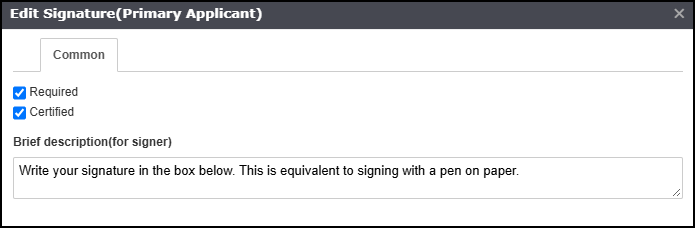
- Required and Certified are both enabled by default.
- You have a Brief Description option available.
 |  |
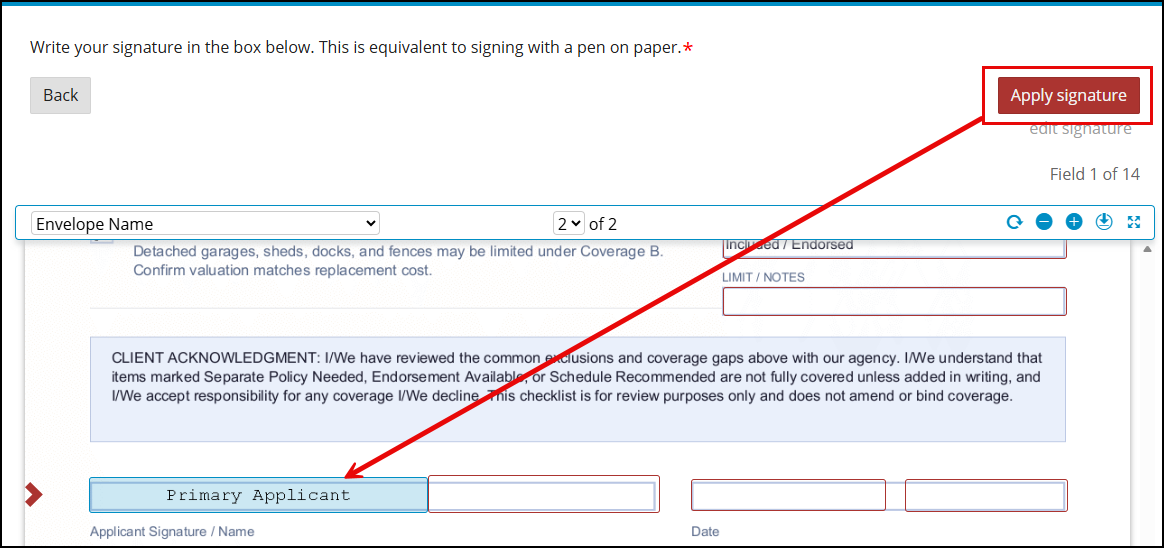
Recipient View: When your recipient reaches a Signature field, they choose whether to draw it with their mouse or type it, then it's applied to the field.
Please note, the signature alignment is centered in the box and cannot be changed of configured.
 |  |
Typed Signature
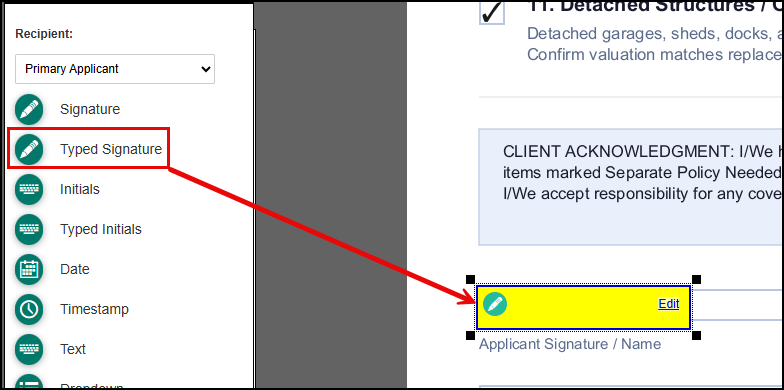
The Typed Signature field requires the recipient to create their signature by typing their name - there's no draw-with-mouse option on this field type.
Setup:
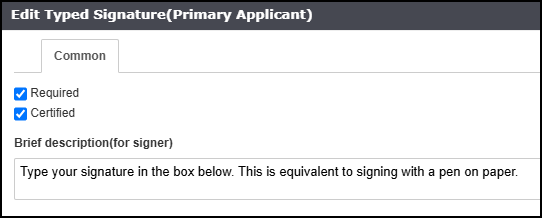
- Required and Certified are both enabled by default.
- You have a Brief Description option available.
 |  |
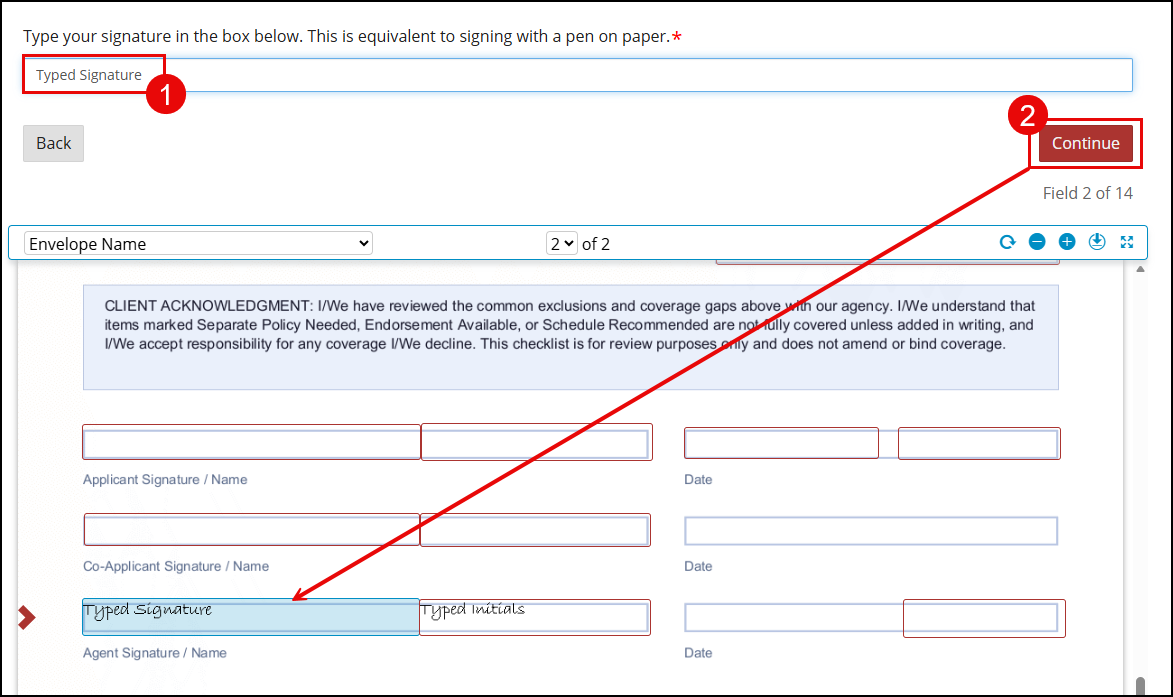
Recipient View: The Recipient types their name into the field and clicks the Continue button to move to the next field.
Please note, the typed signature text is left aligned in the box and cannot be changed of configured.
Initials
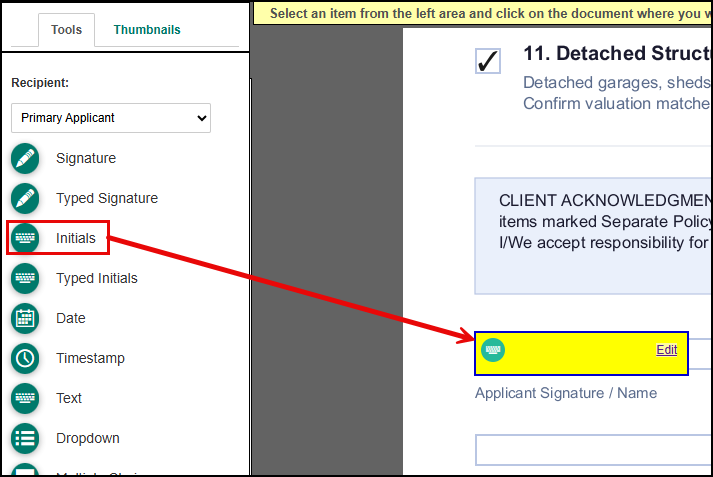
The Initials field asks the recipient to create their initials, either by drawing them with their mouse or typing them with their keyboard.
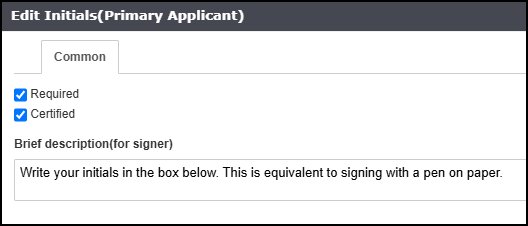
Setup:
- Initials works together with all other Initials fields on the document - meaning if a recipient adopts their Initials once, it can be easily applied across every Initials field on the document (more on this in the Signature vs. Typed Signature section below).
- Required and Certified are both enabled by default.
- You have a Brief Description option available.
 |  |
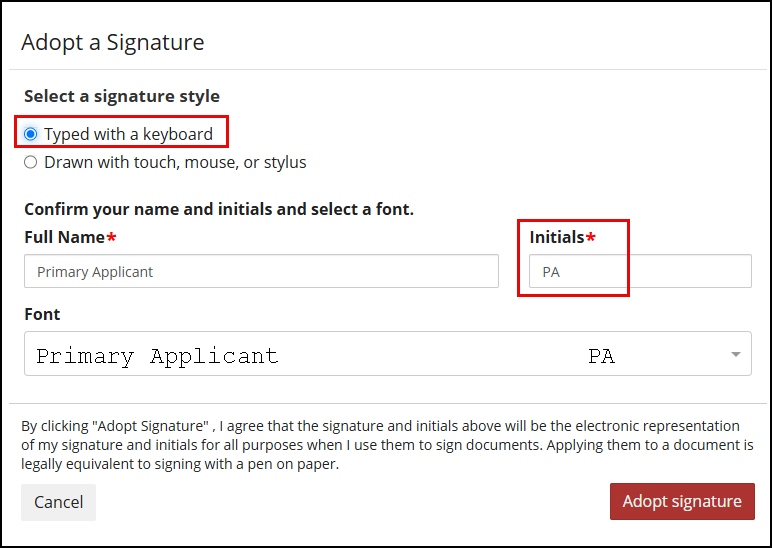
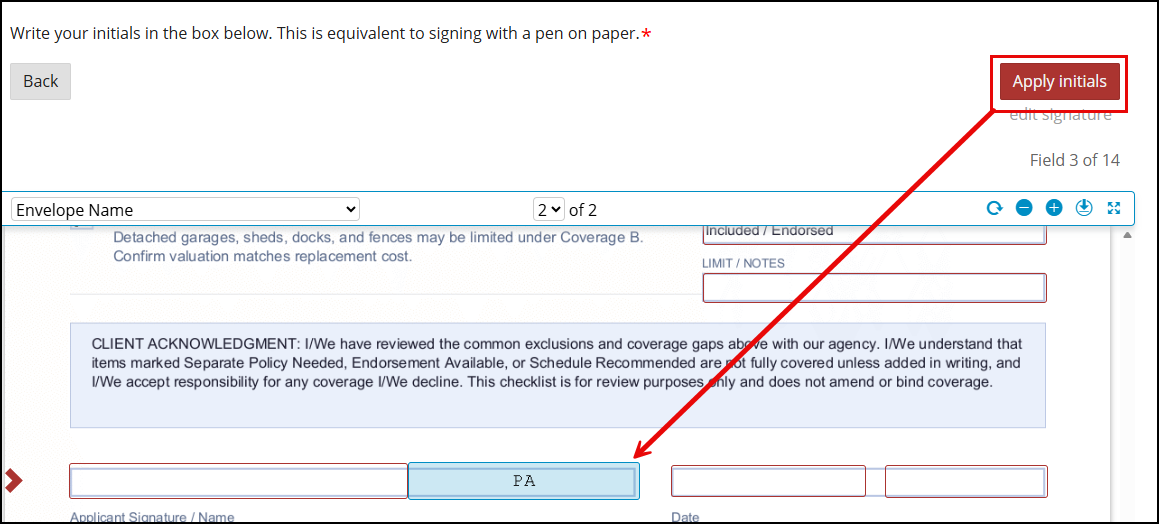
Recipient View: Same mechanics as Signature - the recipient draws or types their initials.
Please note, the initials text alignment is centered in the box and cannot be changed of configured.
 |  |
Typed Initials
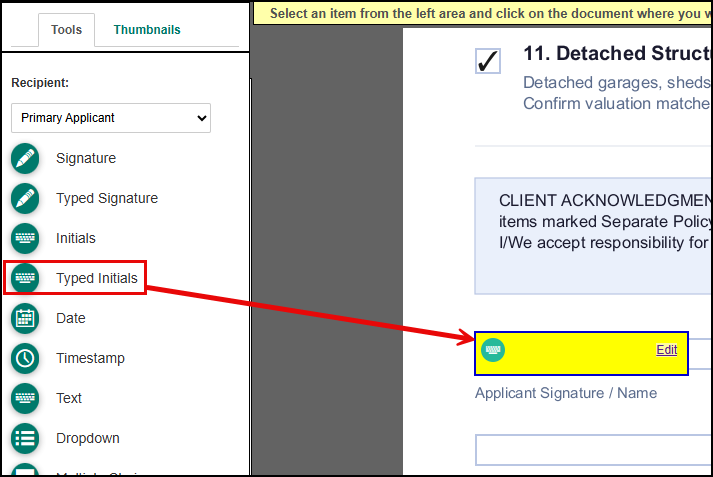
The Typed Initials field requires the recipient to type their initials out - no draw option here.
Setup:
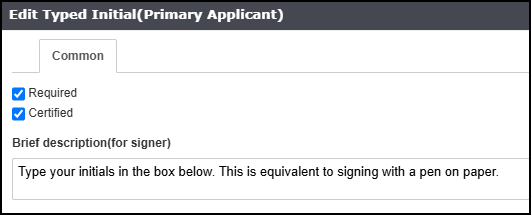
- Required and Certified are both enabled by default.
- You have a Brief Description option available.
 |  |
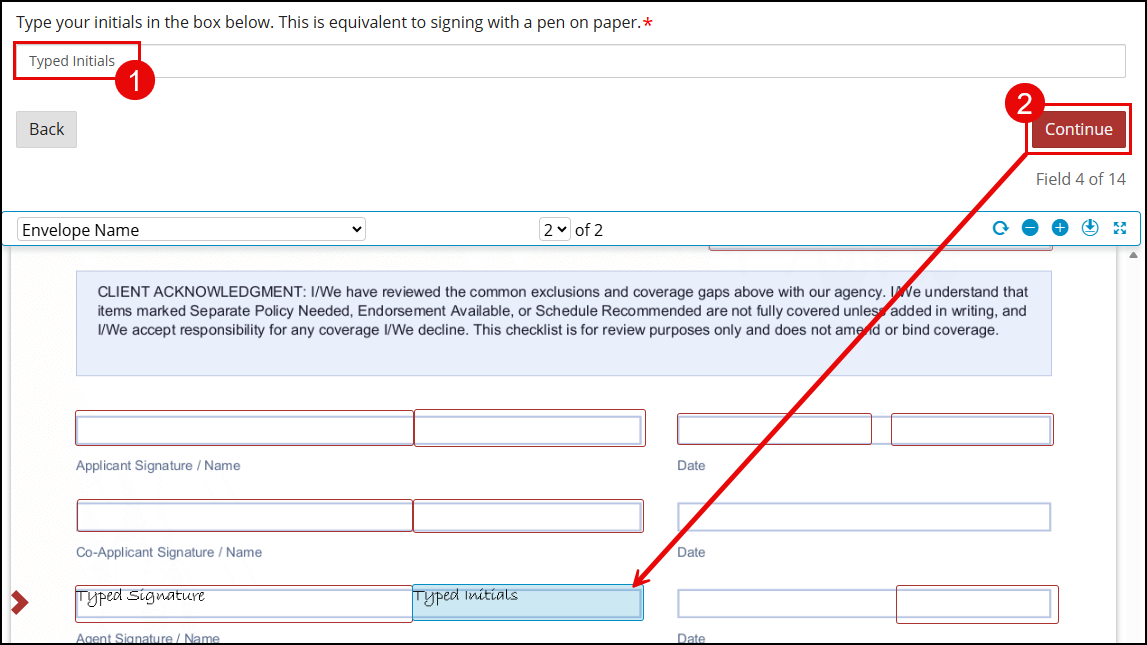
Recipient View: The Recipient types their initials into the field and clicks the Continue button to move to the next field.
Please note, the typed initials text is left aligned in the box and cannot be changed of configured.
Signature vs. Typed Signature: Which Should You Use?
You might be wondering why EZLynx offers both a "draw it" version and a "type it" version of Signature and Initials. Here's the difference:
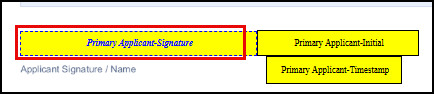
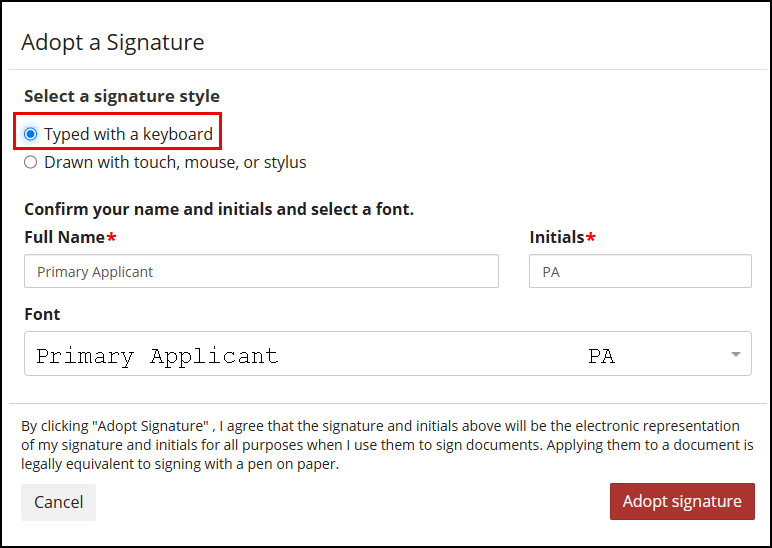
- Signature and Initial fields apply across the whole document (or documents). Once your recipient sets how they want to sign - mouse or typed - that choice carries over to every Signature/Initials field in the envelope the simply just need to click the Apply button for each of those fields rather than having to type/draw it every single time.
- Typed Signature and Typed Initials fields don't carry over. The recipient has to retype their signature or initials for every single Typed Signature/Typed Initials field you've placed.
| Best Practice Tip - If you want to make signing fast and easy for your customer, stick with the Signature and Initials fields (not the Typed versions) and have your recipient choose "Typed with a keyboard" when they sign. They'll get the convenience of typing their signature/initials without having to retype it for every field. |
 |  |
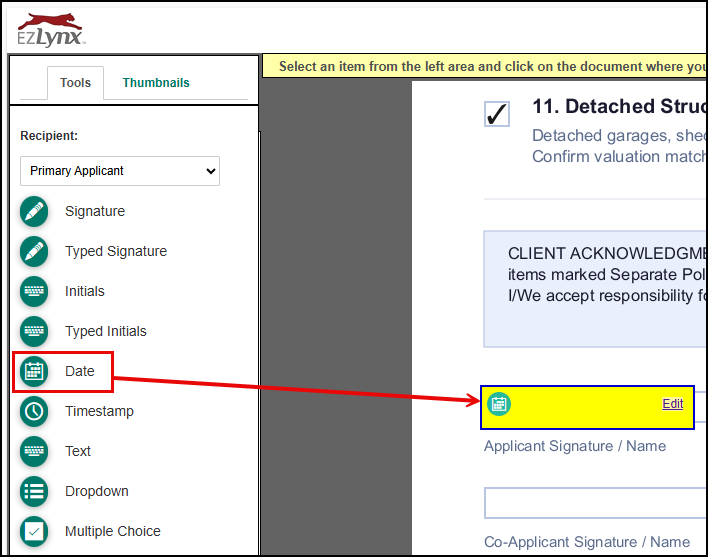
Date
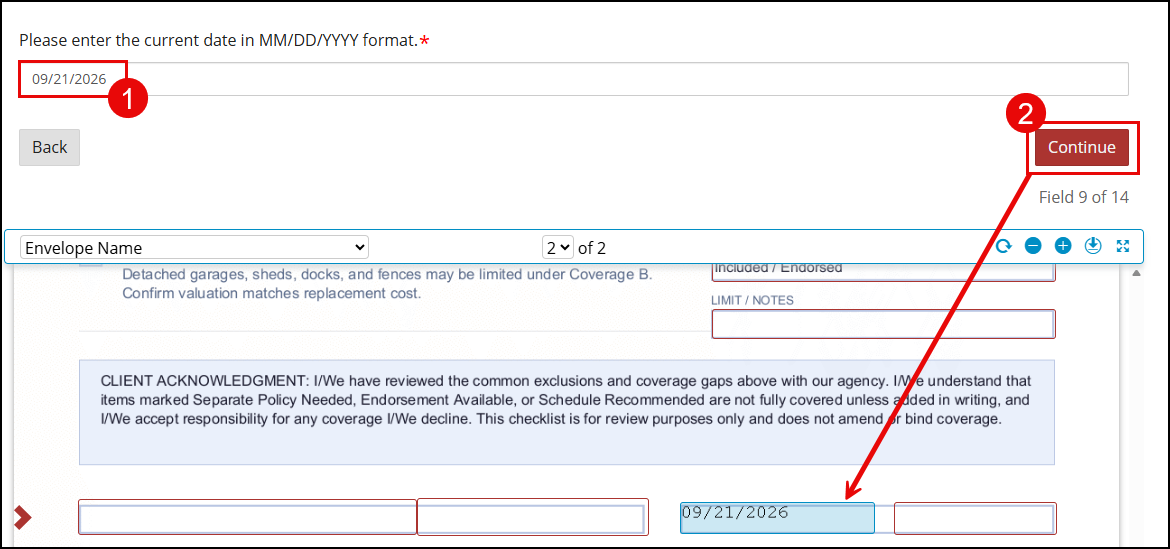
The Date field requires the recipient to enter the current date.
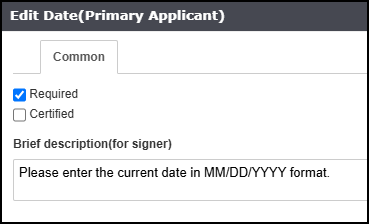
Setup:
- Customization options: Required, Certified, Brief Description.
- Only Required is enabled by default.
 |  |
Recipient View: The recipient enters today's date directly into the field using the MM/DD/YYYY format. No other format will be accepted. They click the Continue button to move to the next field.
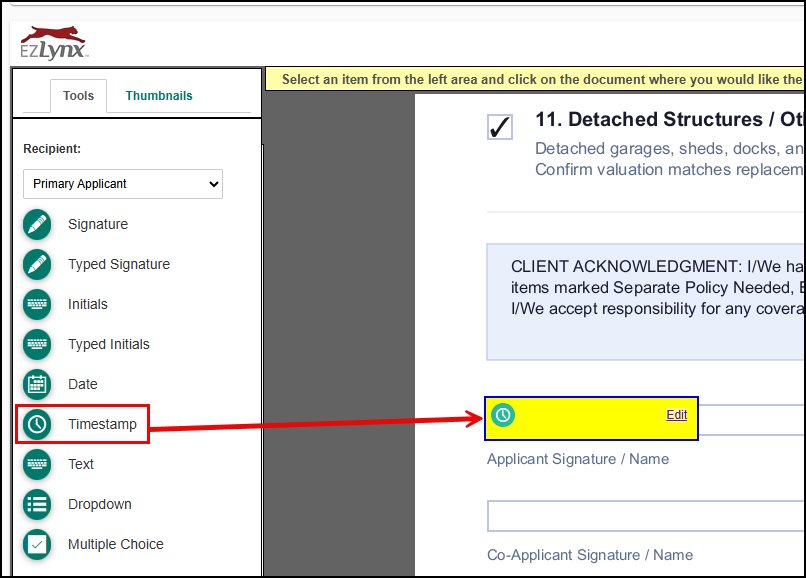
Timestamp
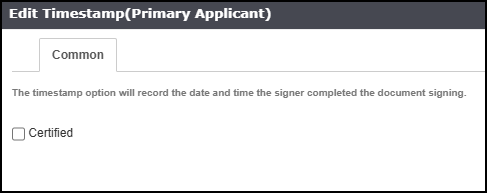
Timestamp is a Universal Time (UTC) timestamp that's added to the document automatically - your recipient doesn't do anything with it, and they won't even see the field while they're signing. It only becomes visible once the completed document is completed and downloaded.
Setup:
- The only customization option is Certified and it's not enabled by default.
 |  |
Recipient View: None - this field is invisible during the signing process and only shows up on the finished document.

Text
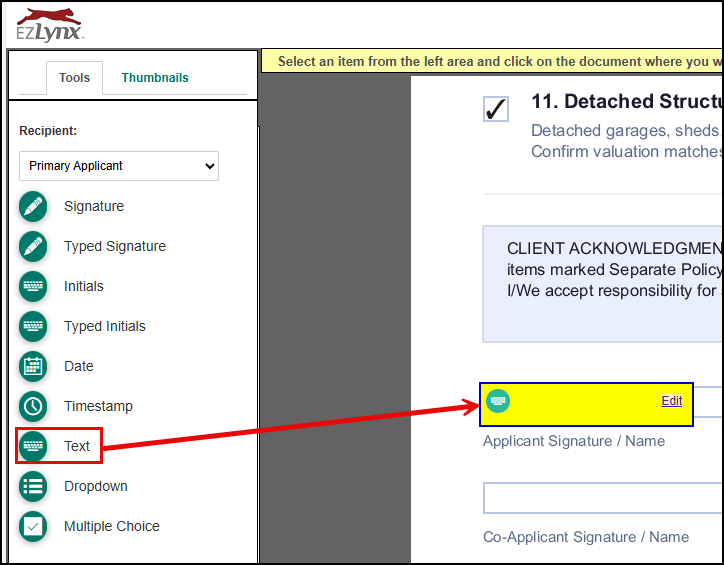
The Text field lets the recipient type in whatever information you've requested directly into the box.
Setup:
- Customization options: Required, Certified, Brief Description.
- Only Required is enabled by default.
 | 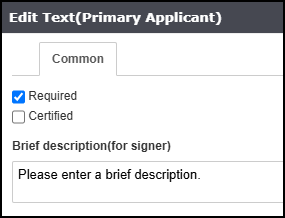 |
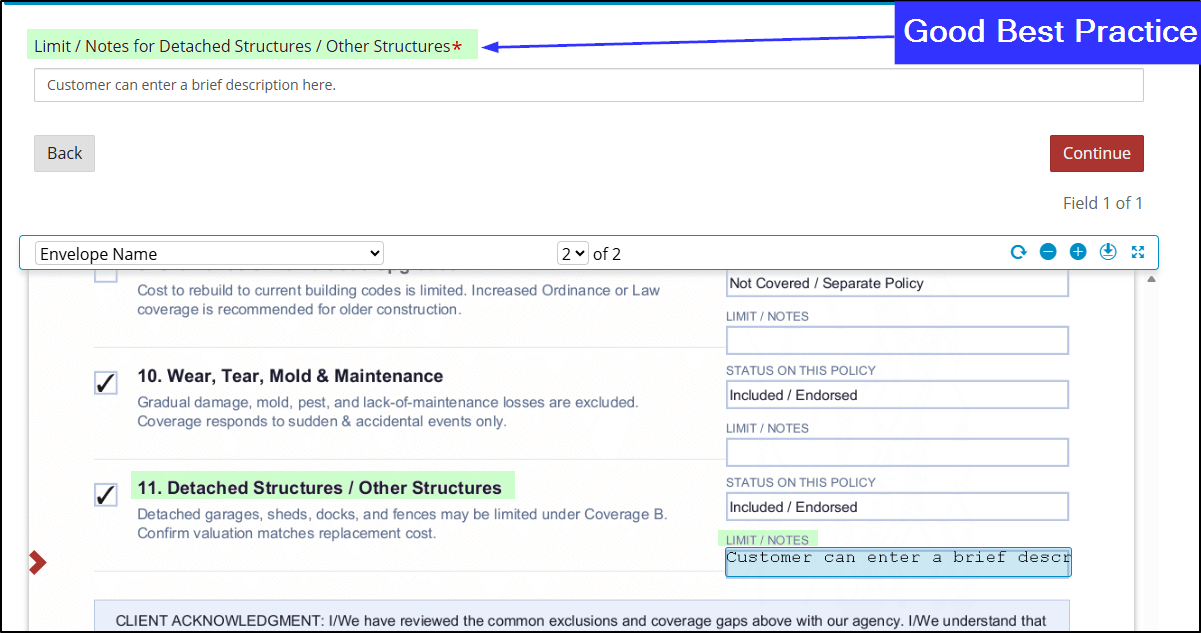
| Best Practices Tip - Always fill in the Brief Description for Text fields with the exact question or prompt you want answered. Without it, your recipient is looking at an empty box with no context for what to type. |
Recipient View: The recipient types into the field what they would like to say and then click the Continue button to move to the next field.
Dropdown
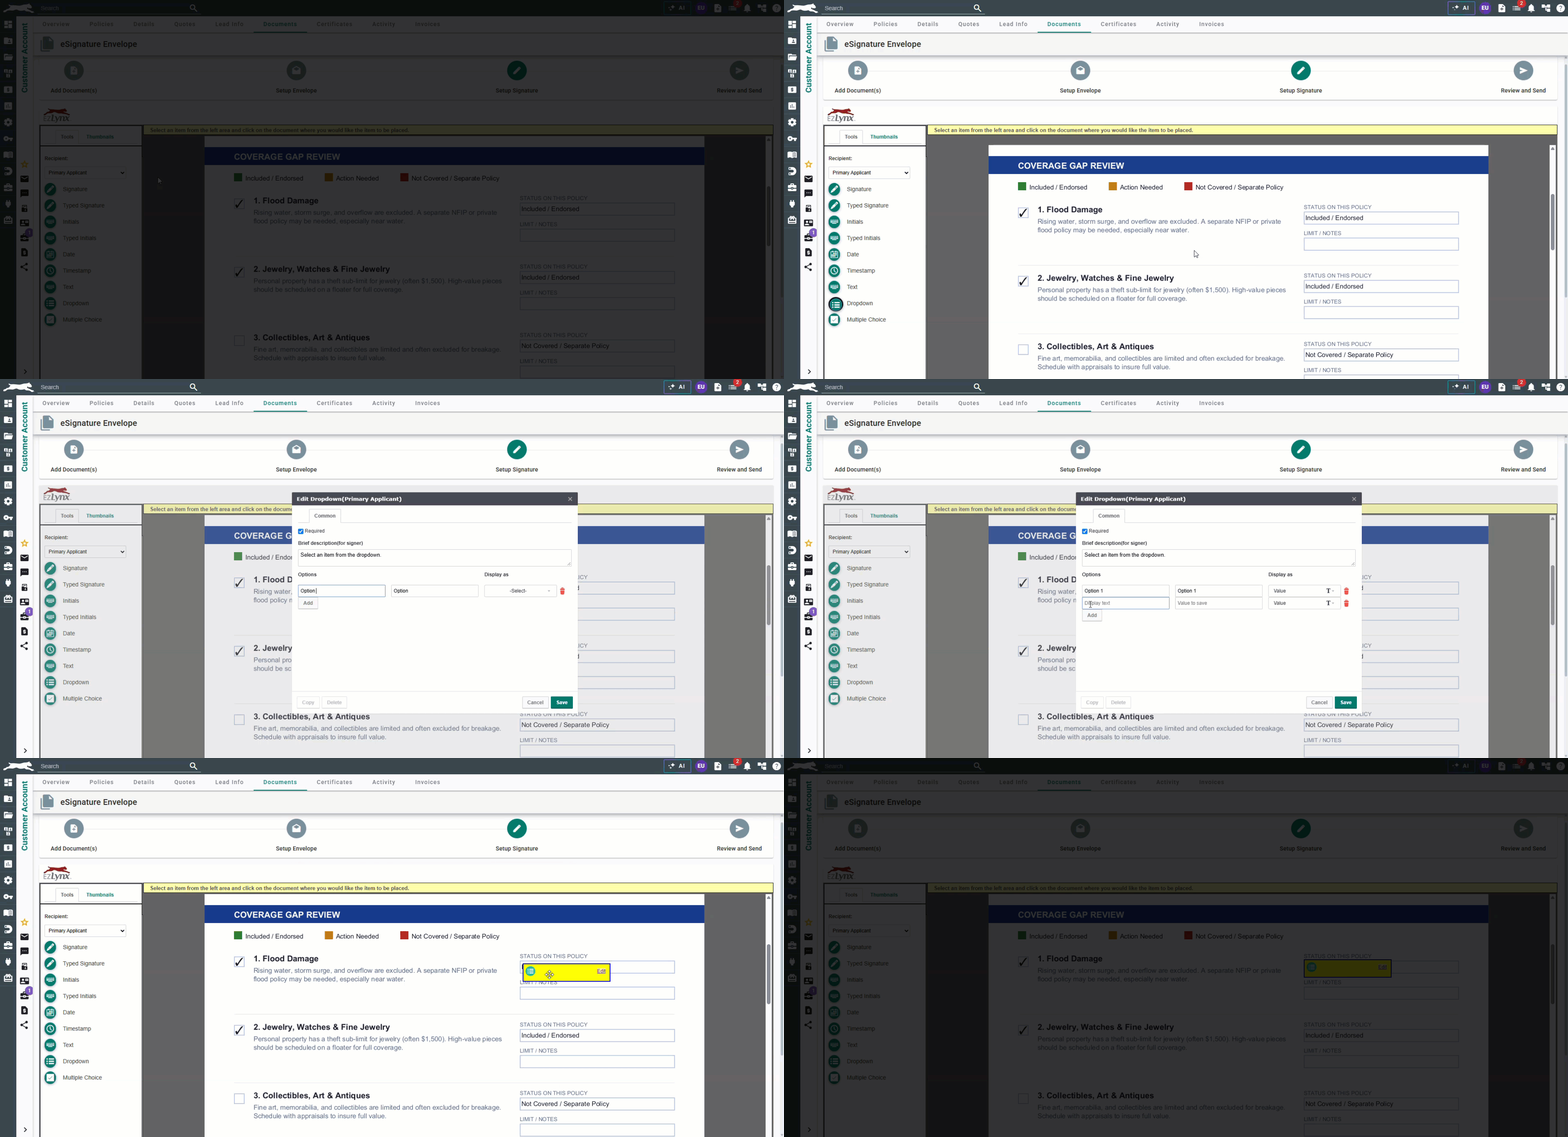
The dropdown field lets the recipient pick one option from a list you define - useful when you want to limit answers to a fixed set of choices.
Setup:
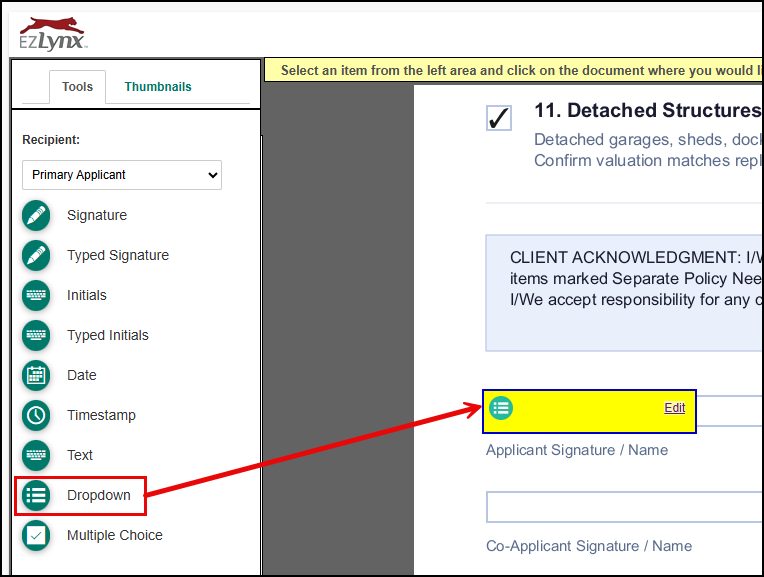
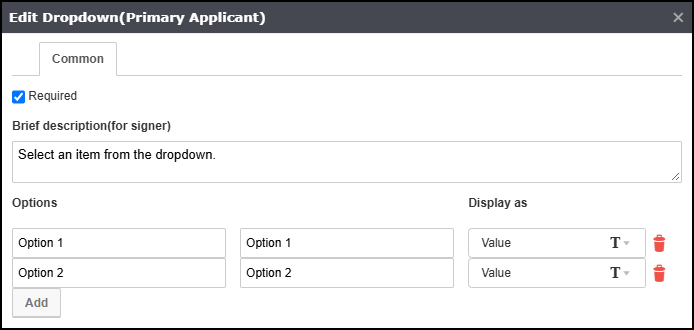
- Type your option into the Display text field.
- Click Add to create additional options.
- Use the Display as dropdown to change how each option appears to the recipient.
- When you've added all of the options, click Save and the field will be created.
- You must choose a "Display as" option to finish setting up the field - there is no default selected.
- Customization options: Required, Brief Description
- Required is enabled by default.
 |  |
| Best Practices Tip - Use the Brief Description to spell out the question the dropdown is answering - it's just as important here as it is on Text fields. |
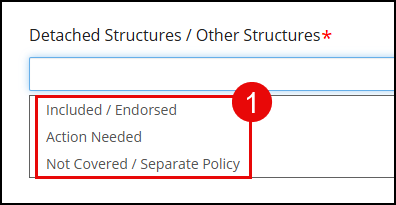
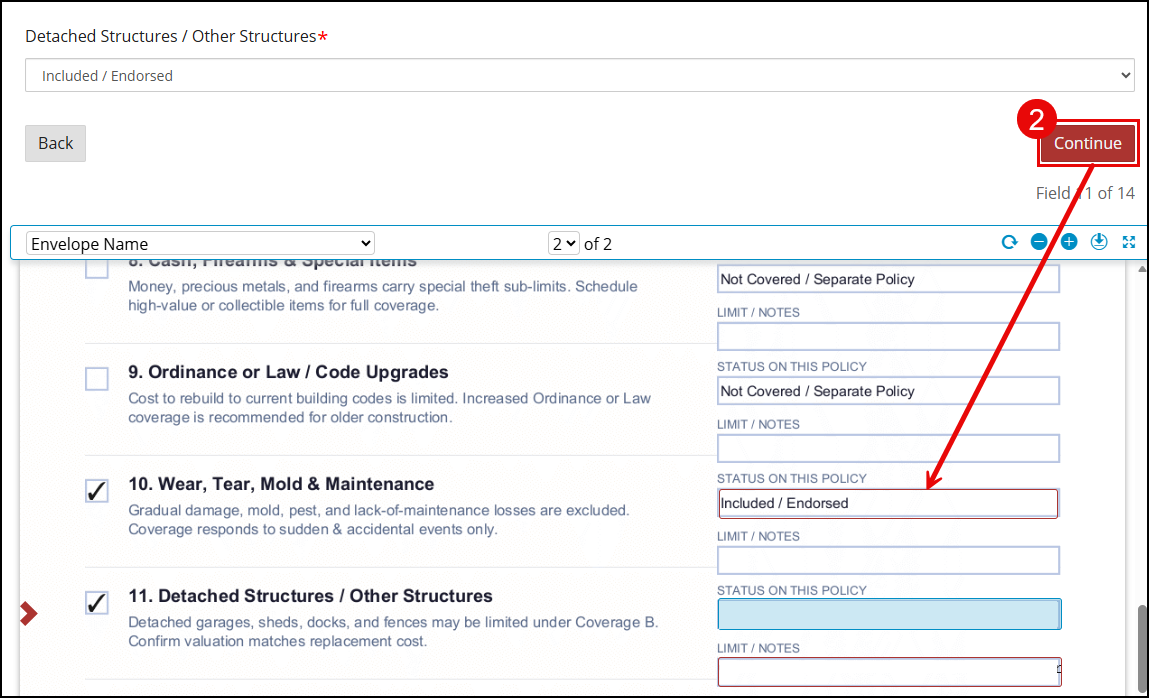
Recipient View: The Recipient opens the dropdown and selects the option that fits their situation. Then, they click the Continue button to move to the next field.
 |  |
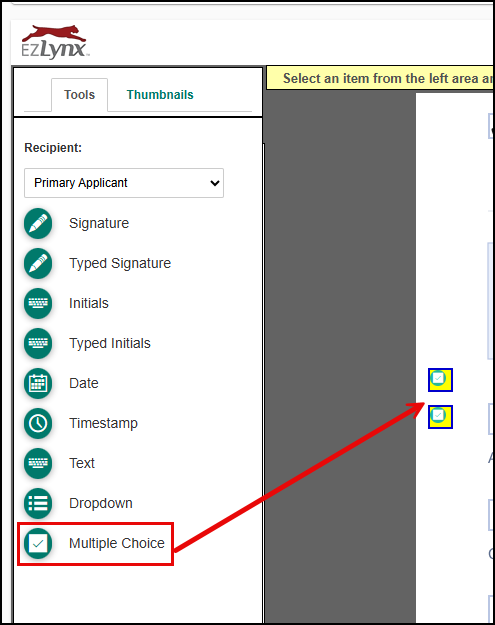
Multiple Choice
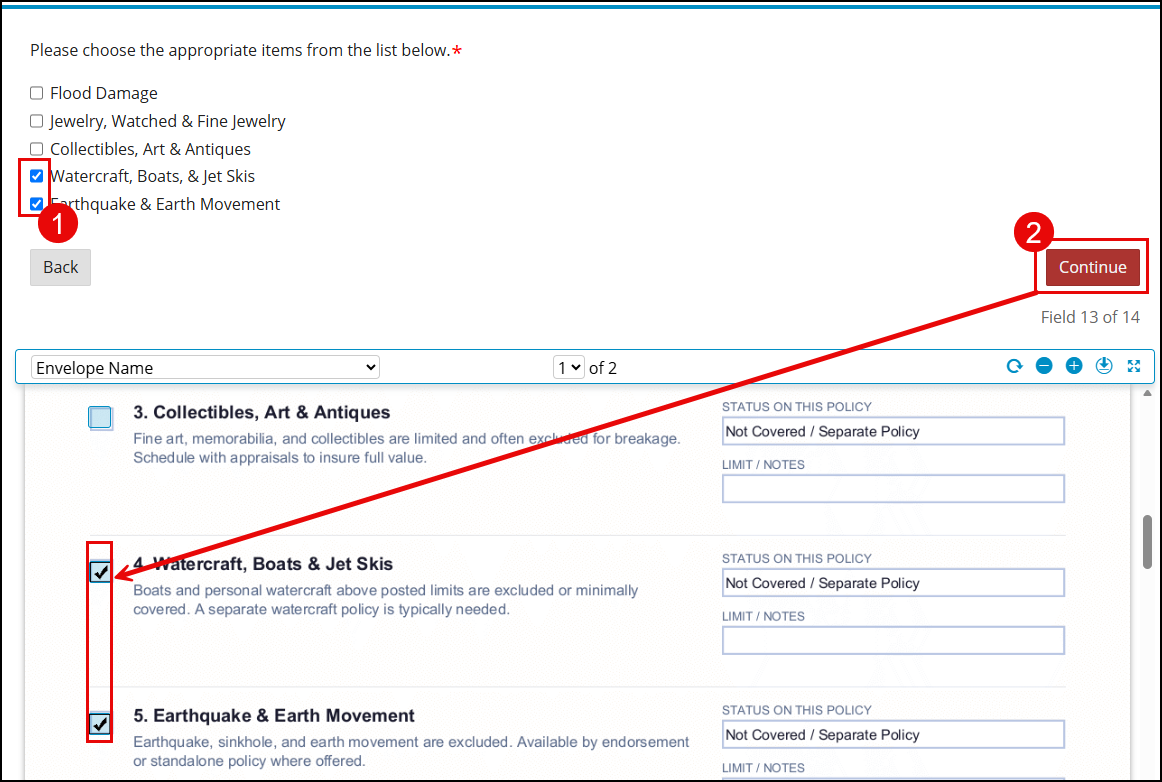
The Multiple Choice field lets the recipient check the option(s) that apply to them.
Setup:
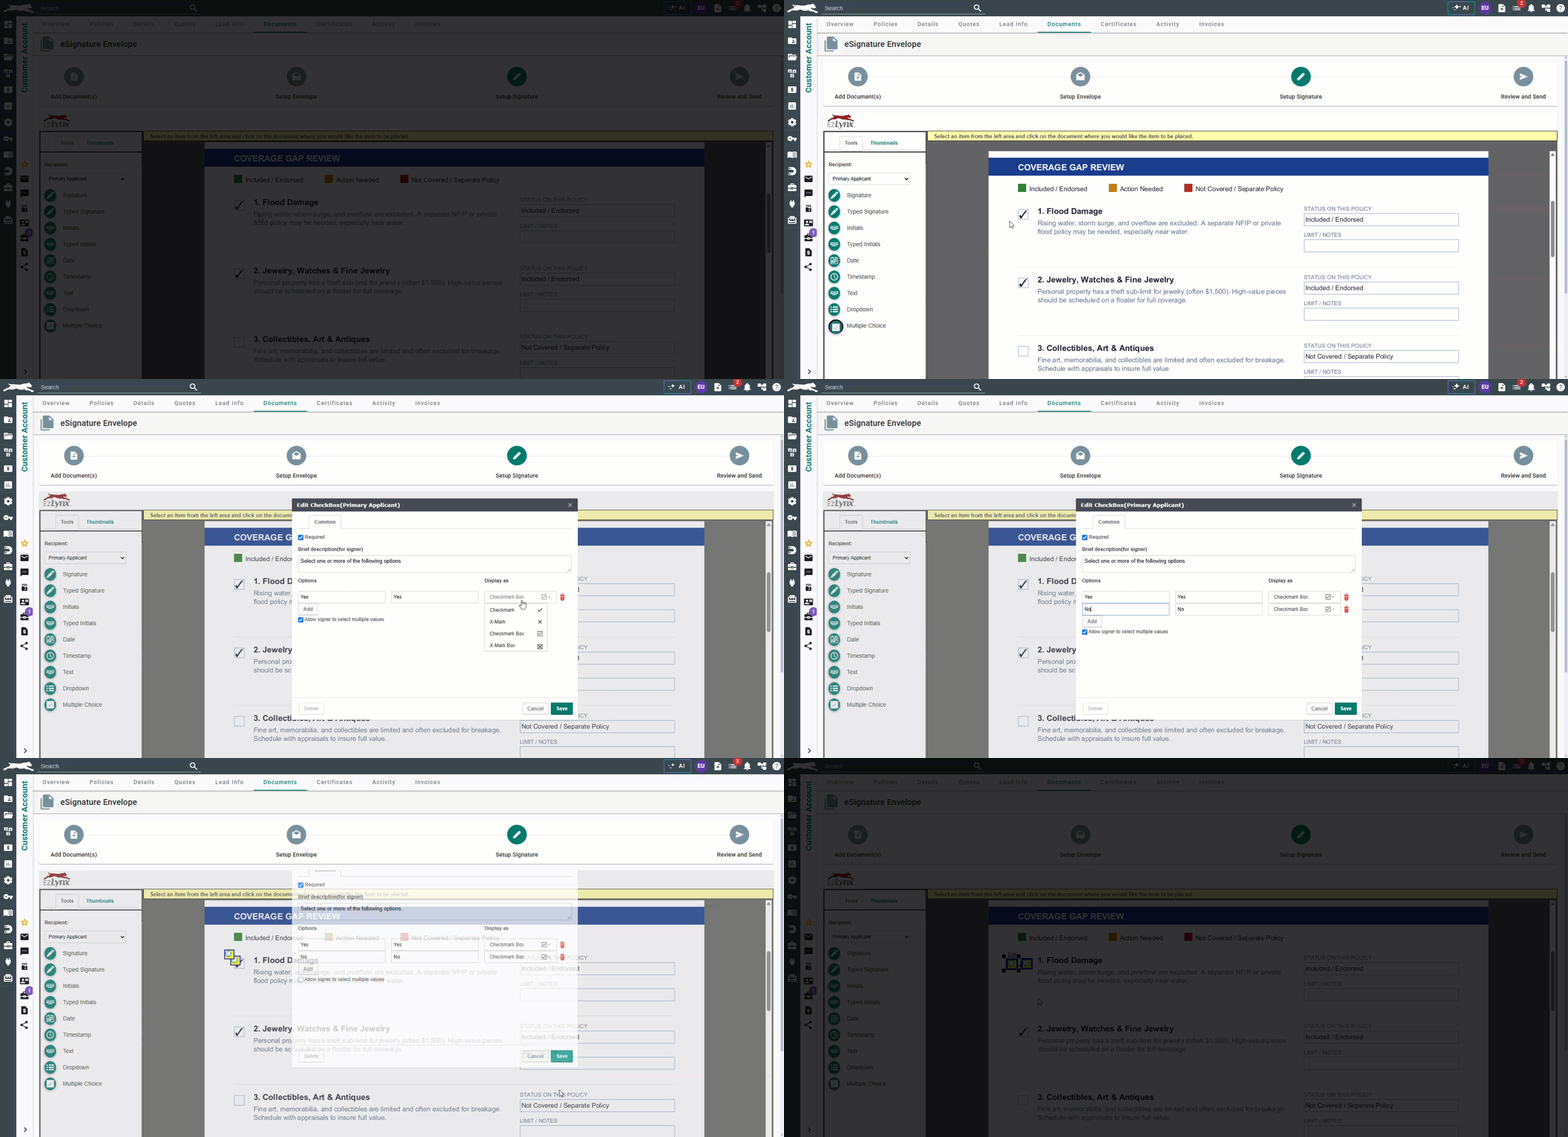
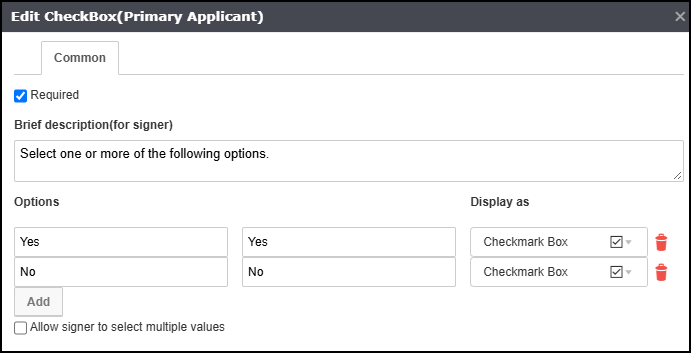
- Type each option into the Display text field.
- Click Add to create additional options.
- Use the Display as dropdown to change how each option appears - Checkmark box is the default display style.
- Check Allow Signer to let the recipient select more than one value, or uncheck the box to limit them to a single choice - Allow signer to select more than one value is the default option.
- When you've added all your options, click the Save button and the field will be created.
 | Watch out for this - Yes/No fields: If you're setting up a Multiple Choice field as a "Yes" / "No" question, make sure Allow Signer (multiple values) is unchecked. If it's left enabled, your recipient could technically check both "Yes" and "No" on the same question. This matters most when you're using several Yes/No Multiple Choice fields on one document - disable multiple values on each on individually. |
- Customization options: Required, Brief Description, Allow Signer
- Required, and Allow Signer is enabled by default.
 |  |
Recipient View: The Recipient checks the box(es) next to the option(s) that apply to them and then click Continue to move to the next field.
Quick Reference: Defaults at a Glance
| Legend ✅ = Available and enabled by default ❌ = Available but not enabled by default - = Not available for this eSignature field |
| Field | Required (Default) | Certified (Default) | Brief Description available? |
|---|---|---|---|
| Signature | ✅ | ✅ | ✅ |
| Typed Signature | ✅ | ✅ | ✅ |
| Initials | ✅ | ✅ | ✅ |
| Typed Initials | ✅ | ✅ | ✅ |
| Date | ✅ | ❌ | ✅ |
| Timestamp | - | ❌ | - |
| Text | ✅ | ❌ | ✅ |
| Dropdown | ✅ | - | ✅ |
| Multiple Choice | ✅ | - | ✅ |
We hope this deep dive helps you choose the right eSignature field for whatever you need signed or answered. For the full envelope-building workflow, check out How to Create and Send an eSignature Envelope, and to see the process from you recipient's point of view, see How does a Customer Sign eSignature?
Did you find it helpful? Yes No
Send feedback