Agency Workspace - Notes, Tasks, & Task Reminders
Modified on: Mon, 10 Feb, 2025 at 5:27 PM
Agency Workspace is available to our Management System users. The Agency Workspace is designed for agency-wide collaboration, to keep everyone within an agency on track with common goals and to ensure important tasks don’t fall through the cracks.
TABLE OF CONTENTS
- How to Add a Note
- How to Add a Task
- Checklists
- Labels, Sticky Notes, Attachments, Policies, & Followers
- Notifications
- Agency Activity & Tasks
 | Did you know? - You can click on the images in our articles to make them bigger! |
How to Add a Note

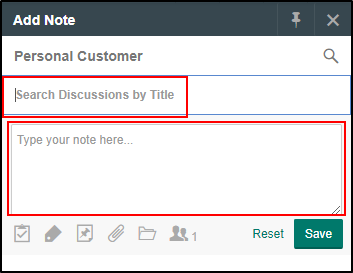
Using the search bar find the account that you need to Add a Note for. By default, if you are already on a customer's account the system will pre-fill that customer's information for you. However, you can always click into the search bar and find a different account if you need to.

In the Discussion Title field, you can look for already open discussions to add a note to the conversation as an update, or you can type in a whole new Discussion Title to start a new conversation. We recommend making specific Discussion Titles so that it's easier to find the right one when making updates to the conversation later on.

To help make sure you are on the right account, if you have a Workspace note or task list open for a specific customer and navigate to different customer's page, you will receive a warning alert message at the top of the Workspace to 'Reset' so Workspace will update to the current customer account you are on. To reset the Workspace, click the Reset button.
A pop-up window will appear to confirm you want to reset the Workspace as you will lose all your current progress if you do. If you want Workspace to update to the new customer account, continue, click Yes. If you do not want to lose your current progress, click No then click the Save button to save your work on the customer account you were previously on.
If you do not want to receive warning alerts when navigating from one customer account to another while you have Agency Workspace open, check out our EZLynx Basics - User Settings article to learn how to update your preferences.


How to Add a Task
Notice the row of grey icons below the Note Field, used to customize your Note & set the details. The 1st icon, that looks like a Clipboard with a Check mark, makes the Note into a Task.
Creating a Task allows you to Assign to other users within the agency, when selecting the Person Icon field, in the Task Details. Also give the Task a Due Date by selecting the field below. A user can optionally Add a Reminder, as well.

Select who will be reminded of the Task; The Assignee (or user who is Assigned To the Task), Followers (a user that is selected as a Follower to stay up to date with the Task), and/or Myself (the user who created the Task). Select just one, or all three, if desired.
Also select how these users will be reminded of the Task; Via Email, Text, or EZLynx Notification. If your agency does not have the Text option, contact support@ezlynx.com for setup.
You may add up to 10 total Reminders per task.
Checklists
While you are adding a task, you can also add a checklist to the task. Checklists help to make sure tasks are completed the same way every time for procedure-based agencies. To add a checklist, a Management System Admin will first need to make the checklist template. Once the checklist template is made, you can add the checklist to a task by selecting the Task icon, then choosing Add Checklist.
To learn how to make a checklist template, check out our Management System - Settings Customization training article!

Labels, Sticky Notes, Attachments, Policies, & Followers
After the Add Task icon, the remaining grey Note Icons are Add Labels, Toggle Sticky Note, Add Attachments, Associate to a Policy, and Followers.

Labels
A user can select the tag icon to Add Labels for additional tracking and Reporting purposes for Notes & Tasks created. Labels are used to group like topics for better organization; Similar to Discussion Titles. Select from a drop down which includes EZLynx generated labels - Or choose to customize and Create a Label, by selecting the blue link in the top right-hand corner.

Sticky Notes
Select the pushpin icon with a square around it, to Toggle a Sticky Note, which creates a yellow Post-It note on the Overview of an Applicant's account to ensure that the Note does not goes unnoticed by any user within the agency.


The Sticky Note holds the Note itself, Who the Note was Created by, and the Created Date & Time. Also notice the number green circle, which is used to indicate how many Sticky Notes have been added to a particular Applicant's account. Click the Unpin icon on Sticky Note on the Applicant's account, when you are done with the note and ready to Delete.

Attachments
Use the Paperclip icon to Add Attachments to a Note. You can Add an Attachment multiple ways; Attach and Existing Document that was already attached to an Applicant's account prior, Drag and Drop, or Click to Upload. You can later view any Attachment that was added this way. First locate the Applicant's account, then navigate to the Documents tab in the blue ribbon on the top.

Associate to a Note/Task to a Policy
Select the Folder icon to Associate to a Policy from the Applicant's account. Use the Select a Policy drop down field to choose the policy to associate to the Note. EZLynx will only display the policies that have already been input into an Applicant's account, so If there are no policies in the Applicant's EZLynx account, this will not be an option for you until there are.

Followers
Optionally, add Followers to a Note by selecting the icon that shows two people. A Follower is an EZLynx user within the agency that is added to stay up-to-date (or follow) the status and progress of a Note or Task. They are also eligible to receive Text, Email, or EZLynx Notifications as Reminders, if added to the Reminder. To add a Follower, simply type the name of the EZLynx user into the Search field, and select. The total number of Followers that are added, will be indicated with the number next to the people in the icon.

Notifications
Agency Workspace is a great collaboration tool to keep you up-to-date, in real-time, on everything you’re working on in EZLynx. Anytime a user comments or updates something you’re following, you will receive notifications. They should be read and deleted frequently. Click the Notifications (bell) icon in the top right of any EZLynx screen to view new notifications.
Notice that different icon colors and pictures indicate different types of activity. For example, blue usually indicates a note and green indicates a task.
Use the quick links provided in blue to perform various functions like replying to text messages, viewing the entire discussion thread, and opening the applicant's account.
Click the "X" to mark a notification as Read, or select Mark All As Read, if desired. Click Show Read Notifications to see notifications that have been marked as Read within the last 24 hours.

Alerts are found on the EZLynx Dashboard Home Page. Users receive Alerts here for activity relating to the Consumer Quoting portal, Client Center, or applicant Assigned Agent changes.


Agency Activity & Tasks
Users can create tasks with due dates for themselves or others in the agency. Learn how to manage tasks and view agency activity in the EZLynx Management System.
To view all tasks created for one specific applicant, refer to the below box:
On a Customer's Overview tab, under the Tasks box, click View All.
The tasks listed may be assigned to various users in the agency
Tasks are grouped by due date categories. Based on the current day's date, a task is either Overdue, due Today, due in the future (Upcoming), or has No Due Date

Click the Task List icon in the Agency Workspace at the top right of any page in EZLynx.
Tasks might be created by various user in the agency
Each task will show the due date underneath
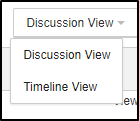
It is possible to change the Task List View, by selecting the drop down (highlighted below)
Tasks are grouped by due date categories: Overdue, due Today, Upcoming, and No Due Date.

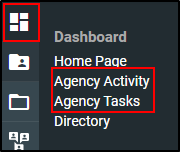
Users can also view the Agency Activity and Agency Tasks by navigating to the Dashboard icon and selecting an option. If these options are not available, email support@ezlynx.com for access.


Search Tasks using the the Search field - Or Filter using the Funnel Icon to the right.
There are 3 Filter options available:
Date
Task Creator
Assigned User

Did you find it helpful? Yes No
Send feedback